
>>

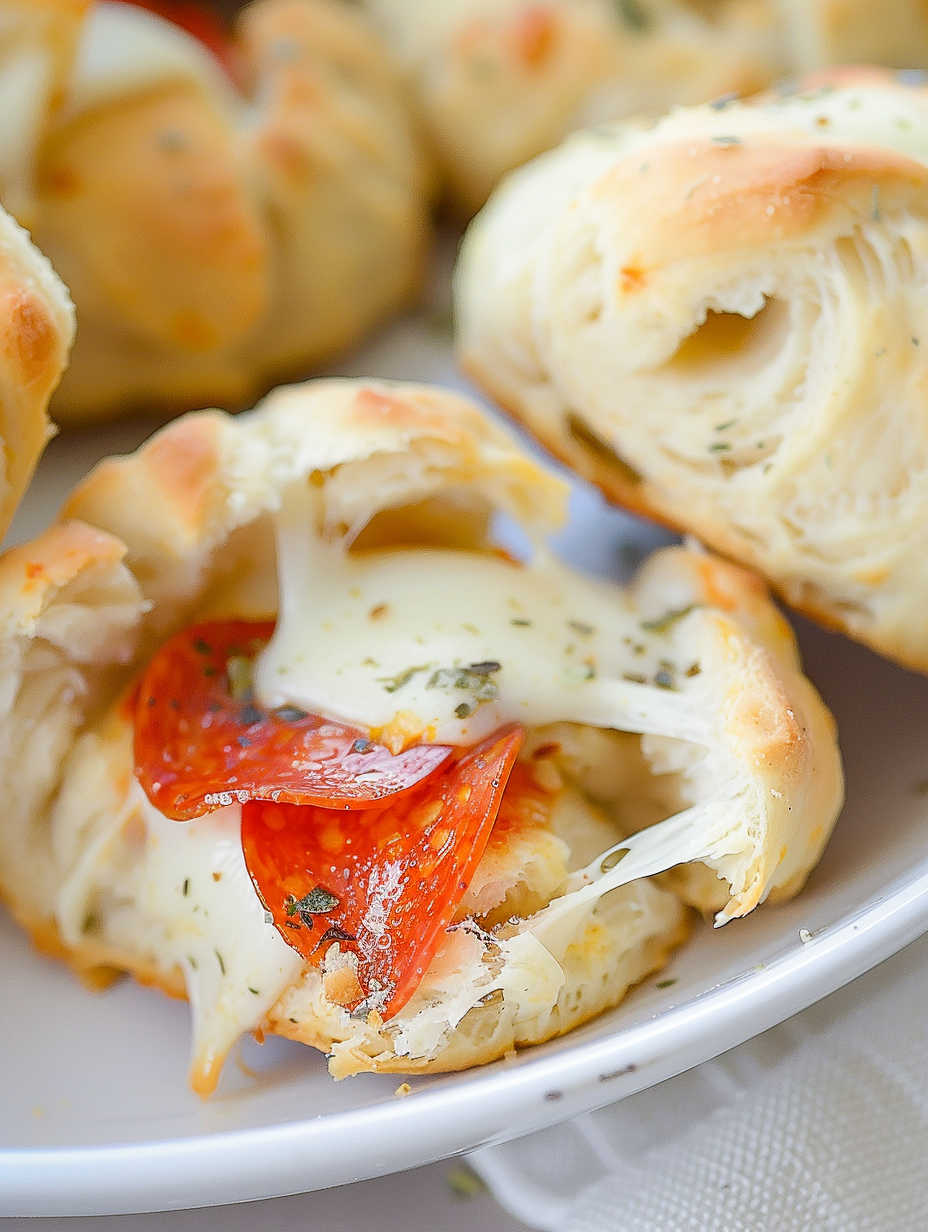
Crispy golden bites of biscuit dough stuffed with melty mozzarella and pepperoni, brushed with garlic butter and air-fried to perfection—perfect for snacks or parties.

This version of pizza bombs has been my go-to snack for game nights, last-minute guests, and weekday cravings. I first discovered this combination when I wanted something faster than homemade dough but still indulgent and shareable. Using refrigerated biscuit dough makes the process nearly foolproof: the layers puff, the outside crisps, and the interior gets deliciously gooey. The first time I served these, my husband declared them better than takeout, and our neighbors asked for the recipe the next morning. The balance of buttery garlic, herby seasoning, salty pepperoni, and molten mozzarella is exactly what I reach for when I want familiar pizza flavors without turning on the oven for an hour.
What makes these bombs special is how quickly they transform from fridge staples into a crowd-pleasing treat. The refrigerated biscuit dough gives a tender, flaky exterior that browns evenly in the air fryer. I learned to chop the cheese into slightly larger cubes and let it come to nearly room temperature before stuffing so the center melts fully in the short air-fry time. I also brush each piece with a simple garlic butter and Italian seasoning glaze so every bite has that pizza-slice aroma without needing to sprinkle cheese on top. They are a small, nostalgic bite that reminds me of childhood pizza rolls but elevated with better texture and flavor.
In my experience, serving these warm with a simple warmed pizza sauce encourages dipping and sharing. Our family often pairs them with a crisp salad to balance the richness, and I always set out extra napkins. The first batch I made disappeared so quickly that I started doubling the recipe for gatherings; they hold their appeal whether served at a weeknight snack or a party platter.
My favorite thing about these is how quickly they become the centerpiece of a casual gathering. Guests instinctively reach for the warm dipping sauce, and kids love tearing them open to watch the cheese stretch. I often pair them with crisp vegetables or a simple arugula salad to cut through the richness, and I always make an extra batch because they disappear fast.

Store cooled bombs in an airtight container in the refrigerator for up to 48 hours to maintain texture and flavor. To prevent sogginess, place a paper towel under the bombs in the container to absorb excess moisture. For longer storage, lay them on a baking sheet and freeze solid, then transfer to a freezer bag for up to 3 months. Reheat refrigerated bombs in the air fryer at 325 degrees Fahrenheit for 3 to 4 minutes; for frozen, air fry at 350 degrees Fahrenheit for 7 to 9 minutes, checking occasionally until hot and crisp.
If you prefer a vegetarian option, swap pepperoni for roasted vegetables such as thinly sliced zucchini, roasted red peppers, or marinated artichoke hearts. For a gluten-free version, use small gluten-free biscuit rounds or crescent roll dough labeled gluten-free, keeping in mind cooking times may vary. Swap mozzarella for a dairy-free melty cheese to make them dairy-free, though texture and melt will differ. To make spicier bombs, add a pinch of red pepper flakes to the garlic butter or use spicy pepperoni.
Serve the bombs hot with a warmed pizza sauce for classic dipping. For a party platter, add a variety of dipping sauces like pesto, ranch, or a roasted red pepper sauce. Pair with a crisp Caesar or arugula salad and a bowl of mixed pickles to balance the richness. Garnish with chopped fresh basil or a sprinkle of grated Parmesan for added aroma and presentation. These are also great alongside soup for a casual lunch or as part of a game-day spread with wings and sliders.
Stuffed dough pockets have global parallels, from calzones in Italy to empanadas in Latin America. These bombs take inspiration from the pizza tradition—combining bread, cheese, and cured meat—compressed into a single bite. The technique of using refrigerated biscuit dough is a modern convenience that shortens preparation time compared to traditional hand-tossed dough, reflecting how home cooks adapt classic flavors to contemporary, time-saving methods.
In summer, swap pepperoni for grilled vegetables and fresh basil, adding a drizzle of olive oil after cooking. For winter gatherings, use spicy sausage or add caramelized onions to the filling for deeper flavors. Around the holidays, try a smoked gouda and fig preserve combo for a sweet-savory twist. Adjust herbs in the butter glaze to match seasonal produce—fresh thyme or rosemary in colder months adds warmth.
I once brought a tray of these to a neighborhood potluck and heard people comparing them to artisanal pizza bites. A friend told me she recreated them for her kids the next week and served them with a side of steamed veggies—her picky eater asked for seconds. Another time I prepped a double batch for a holiday movie night; the batch vanished within 20 minutes and guests asked for the recipe card to take home. These little bites have a track record of making casual gatherings feel special.
Assemble the bombs up to the sealing stage and refrigerate on a tray for a few hours before air frying. This short chill firms the dough and makes them easier to handle. For busy weeks, freeze assembled balls on a tray and store in a bag; cook from frozen, adding a couple of minutes to the air-fry time. Portion the dipping sauce into small containers for grab-and-go lunches or party hosting to streamline serving.
These air fryer pizza bombs are an easy, reliable way to get cheesy, savory satisfaction in under 20 minutes. Whether you’re feeding a crowd or making a quick snack, they hit the spot with minimal fuss—give them a try and make them your own with fillings you love.
Let the mozzarella sit at room temperature for 10 minutes before stuffing to ensure a more consistent melt.
Do not overcrowd the air fryer basket; leave space for air to circulate so each piece browns evenly.
Brush the butter mixture on generously for a golden, flavorful exterior and to help the seasoning adhere.
This nourishing air fryer pizza bombs recipe is sure to be a staple in your kitchen. Enjoy every moist, high protein slice — it is perfect for breakfast or as a wholesome snack any time.
Yes. Assemble the bombs and store them in an airtight container in the refrigerator for up to 48 hours. Reheat in the air fryer at 325°F for 3 to 4 minutes.
Flash-freeze on a tray, then transfer to a freezer bag for up to 3 months. Air fry from frozen, adding 2 to 3 minutes to the cooking time.
Use low-moisture mozzarella and let it come closer to room temperature for better melt. If the cheese is cold, it may not fully melt in 5 minutes.
This Air Fryer Pizza Bombs recipe makes perfectly juicy, tender, and flavorful steak every time! Serve with potatoes and a side salad for an unforgettable dinner in under 30 minutes.
Open the can of refrigerated biscuits and separate each biscuit into two thinner rounds, creating 16 pieces. Handle gently and use a lightly floured surface if needed.
Cut pepperoni into quarters to make 32 small pieces. Cut mozzarella into 16 cubes roughly 3/4 inch each and allow to sit at room temperature for 10 minutes if cold.
Place 8 pepperoni quarters and one mozzarella cube in the center of each biscuit round. Fold edges up and pinch to seal tightly, rolling into a smooth ball so cheese will not leak.
Place the balls in a single layer in the air fryer basket with space between each to allow hot air circulation. Cook in batches if necessary.
Mix 1/4 cup melted butter with 1/2 teaspoon garlic powder and 1/2 teaspoon Italian seasoning. Brush mixture evenly over each ball to encourage browning and flavor.
Air fry at 350°F for 5 to 6 minutes until golden brown and cooked through. Watch closely; if pale after 5 minutes, add up to 2 more minutes, checking frequently.
Warm 1/2 cup pizza sauce and serve alongside the bombs for dipping. Serve immediately while hot for best texture and flavor.
Last Step: Please leave a rating and comment letting us know how you liked this recipe! This helps our business to thrive and continue providing free, high-quality recipes for you.
Leave a comment & rating below or tag
@flavest on social media!

Warm-spiced apple cider donuts with tender apple bits and a glossy cider glaze, fried crisp and irresistibly cozy for fall.

All-day slow cooking turns pork shoulder, potatoes, and carrots into a tender, savory classic with a rich homemade gravy everyone will love.

Tender layers of Yukon gold potatoes with seasoned beef in a creamy, cheddar sauce, baked until bubbly and irresistibly comforting.
Leave a comment & rating below or tag @flavest on social media!
Enjoyed this recipe? Share it with friends and family, and don't forget to leave a review!
This recipe looks amazing! Can't wait to try it.
Comments are stored locally in your browser. Server comments are displayed alongside your local comments.

Join to receive our email series which contains a round-up of some of our quick and easy family favorite recipes.
