
Caramel Peanut Butter Cookie Cups

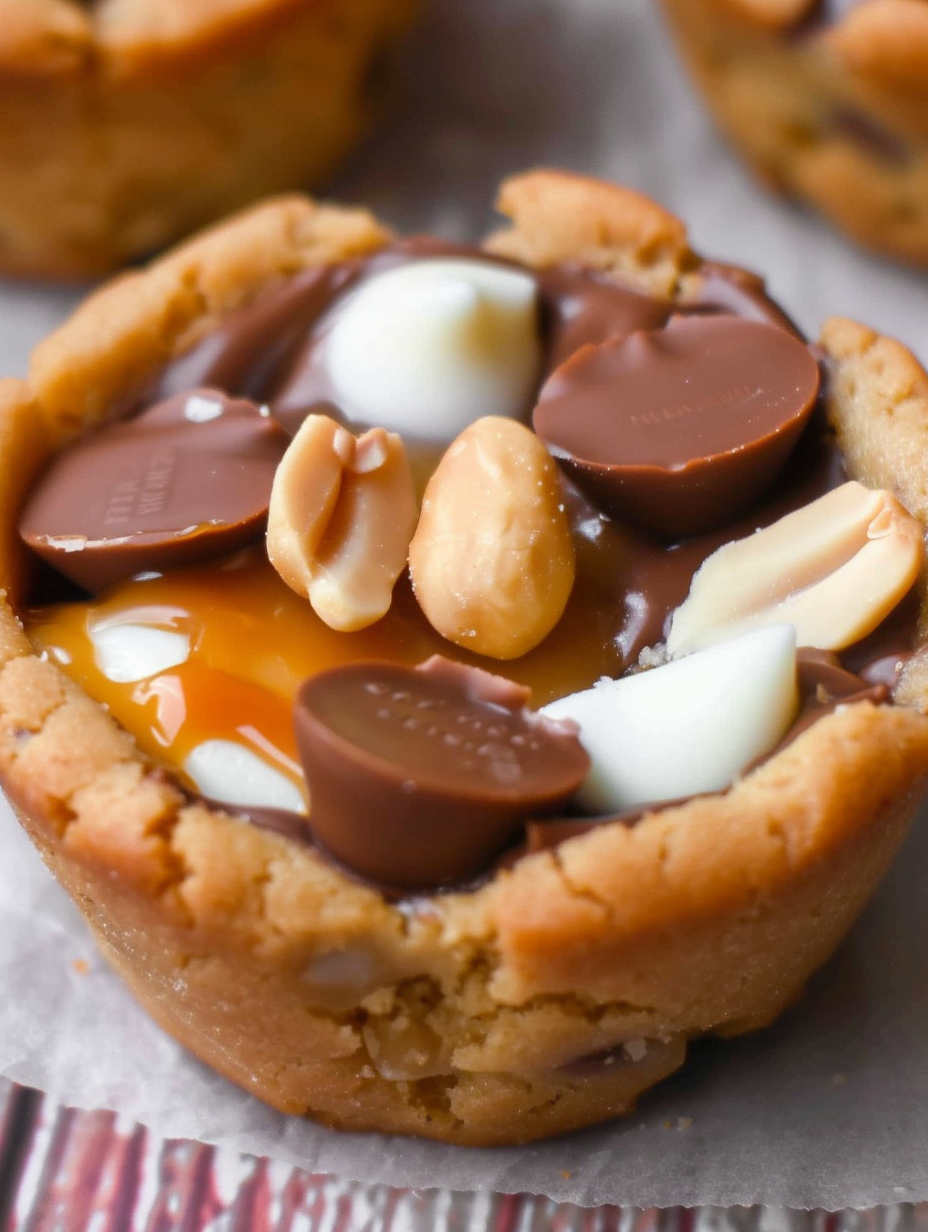
Buttery peanut butter cookie shells filled with soft caramels, mini peanut butter cups, white chocolate minis and roasted peanuts for a crunchy-sweet bite.
This dessert has been my go-to for celebrations ever since I first made it for a family movie night. Caramel Peanut Butter Cookie Cups are everything I love about peanut butter desserts: they start with a tender, buttery peanut butter cookie base that bakes into a shallow cup, then get filled with melting caramels and mini peanut butter cups. The contrast between the chewy cookie, the soft caramel, the creamy chocolate peanut butter candies and the roasted peanuts on top is what keeps people reaching for a second one. I discovered this combination while experimenting with a holiday cookie exchange when I wanted something that felt indulgent but was easy to assemble. The result was an instant hit — even the cousins who claim not to like nutty desserts went back for more.
I treasure recipes that travel well and can be assembled ahead, and these cookie cups fit the bill. They’re forgiving with timing, simple to scale up, and the ingredients are pantry-friendly: peanut butter, butter, brown sugar, a few standard leaveners and your favorite mini candies. The first time I plated them, I remember my grandmother insisting on trying one and then calling me later to ask for the recipe; a true stamp of approval in our family. If you want a dessert that looks impressive but doesn't require piping bags or tempering chocolate, these are for you.
Why You'll Love This Recipe
- Makes 24 portable portions that are perfect for parties, bake sales, or an after-dinner sweet — each is a complete sweet-and-salty treat in one bite.
- Ready in about 32 minutes total: 15 minutes active prep and roughly 17 minutes baking time, ideal for last-minute entertaining.
- Uses pantry staples and store-bought candies so you get homemade flavor without complicated steps; no tempering or candy thermometers required.
- Very adaptable: swap the fillings for allergy-friendly alternatives, or make ahead to bake and fill the day of for fresher candies that keep their shape.
- Appeals to a broad crowd — kids love the mini candies, adults appreciate the caramel and roasted peanuts for texture and flavor contrast.
- Easy to scale: double the batch and bake in a second muffin tin, or halve it for a small gathering.
In my experience, the simple technique of pressing the dough into muffin tins is the magic trick here: no special tools, just your fingers. At a recent potluck these disappeared first, and guests kept asking whether I’d used a boxed dough — which I hadn’t. That balance of nostalgia and elevated candy layering is why I keep making them.
Ingredients
- Salted butter (1 cup): Use a high-quality European-style butter if you can — it adds a richer, creamier base to the dough. Bring it to room temperature so it creams smoothly with the sugars.
- Smooth peanut butter (1 cup): Choose a natural or classic smooth variety depending on how prominent you want the peanut flavor to be. Natural peanut butter gives a pronounced nutty taste but can be slightly oilier.
- Golden brown sugar (1 1/2 cups, packed): Adds moisture and a caramel-like depth to the dough; pack it firmly for accurate measurement.
- Granulated sugar (1/2 cup): Balances the brown sugar and helps the cookie edge set while keeping the center tender.
- Large eggs (2): Room temperature eggs help bind the dough and add structure; they also improve volume during baking.
- Vanilla extract (2 tsp): Real vanilla rounds out the flavors — avoid imitation extract if possible.
- All-purpose flour (2 1/2 cups): Provides structure; spoon and level for accurate measurement to keep the cookies from becoming too dense.
- Baking powder (2 tsp) and salt (1 tsp): Leaveners and salt ensure proper rise and flavor balance.
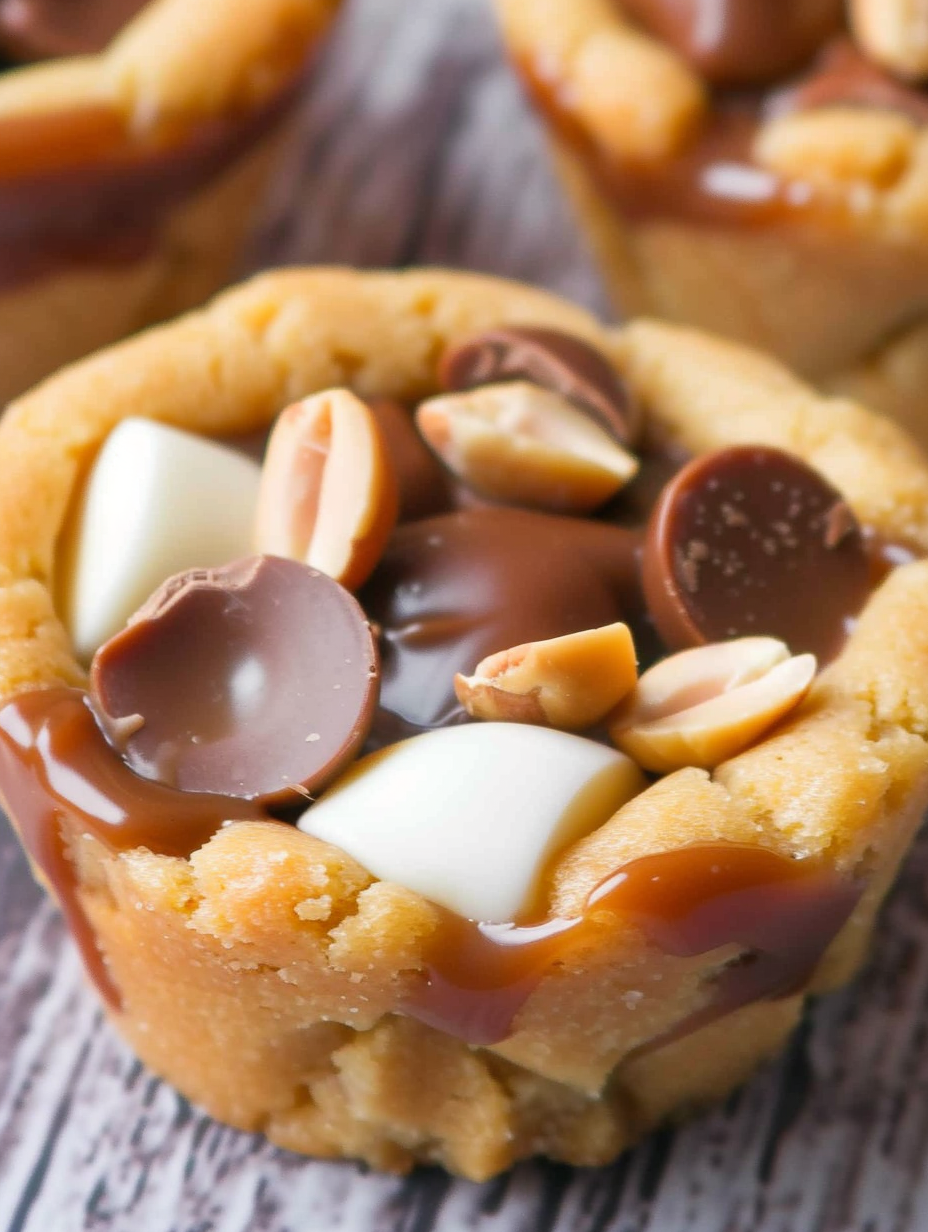
- Kraft caramels (24, about 9 oz): Unwrapped, these become soft pockets of caramel inside each cup.
- Reese's Peanut Butter Cup Minis (8 oz) and Reese's White Chocolate Minis (8 oz): The classic and white chocolate minis create contrasting chocolate layers and visual interest.
- Roasted salted peanuts (1/2 cup): Coarsely chopped for crunch; salted peanuts enhance the sweet components.
Instructions
Preheat the oven: Preheat to 350°F. Grease a 24-cup muffin tin liberally with baking spray or softened butter, making sure to coat the cavity sides to help the cookie cups release later. This step is crucial for clean removal once cooled. Cream the fats and sugars: In a large mixing bowl, use an electric mixer to cream together the salted butter, smooth peanut butter, golden brown sugar and granulated sugar until light and fluffy, about 2 to 3 minutes. Scrape the bowl once to ensure even texture; this incorporates air for a tender crumb. Add eggs and vanilla: Add the eggs one at a time, beating after each addition, then mix in the vanilla. The batter will appear glossy; this indicates a good emulsion between the fats and eggs, which helps the cookie hold its shape. Combine dry ingredients: Whisk together the flour, baking powder and salt in a separate bowl. Gradually add to the wet mixture while mixing on low, just until combined. Overmixing develops gluten and can toughen the cookie, so stop when no streaks of flour remain. Form the cups: Dollop about 2 tablespoons of dough into each greased muffin cavity and use your fingers to press it into a shallow cup, building up edges slightly higher than the center. Make sure walls are even so they bake uniformly. First bake: Bake in the preheated oven for 11–13 minutes, or until the edges are just beginning to brown but the centers still look slightly underbaked. These visual cues prevent over-browning once you add the fillings and finish baking. Add fillings and finish baking: Remove the tin from the oven. Place one unwrapped caramel in the center of each cookie cup, pressing down gently. Nestle two chocolate peanut butter cup minis and two white chocolate minis on top of the caramel, then sprinkle with roasted peanuts. Return to the oven for 5 more minutes to soften the candies and finish the cup edges. Cool and unmold: Allow the cookie cups to cool in the pan for about 15 minutes before attempting to remove them. This cooling time lets the caramel and cookie set; removing them too soon will cause them to fall apart. Use a butter knife to loosen edges if needed, then transfer to a wire rack to cool completely.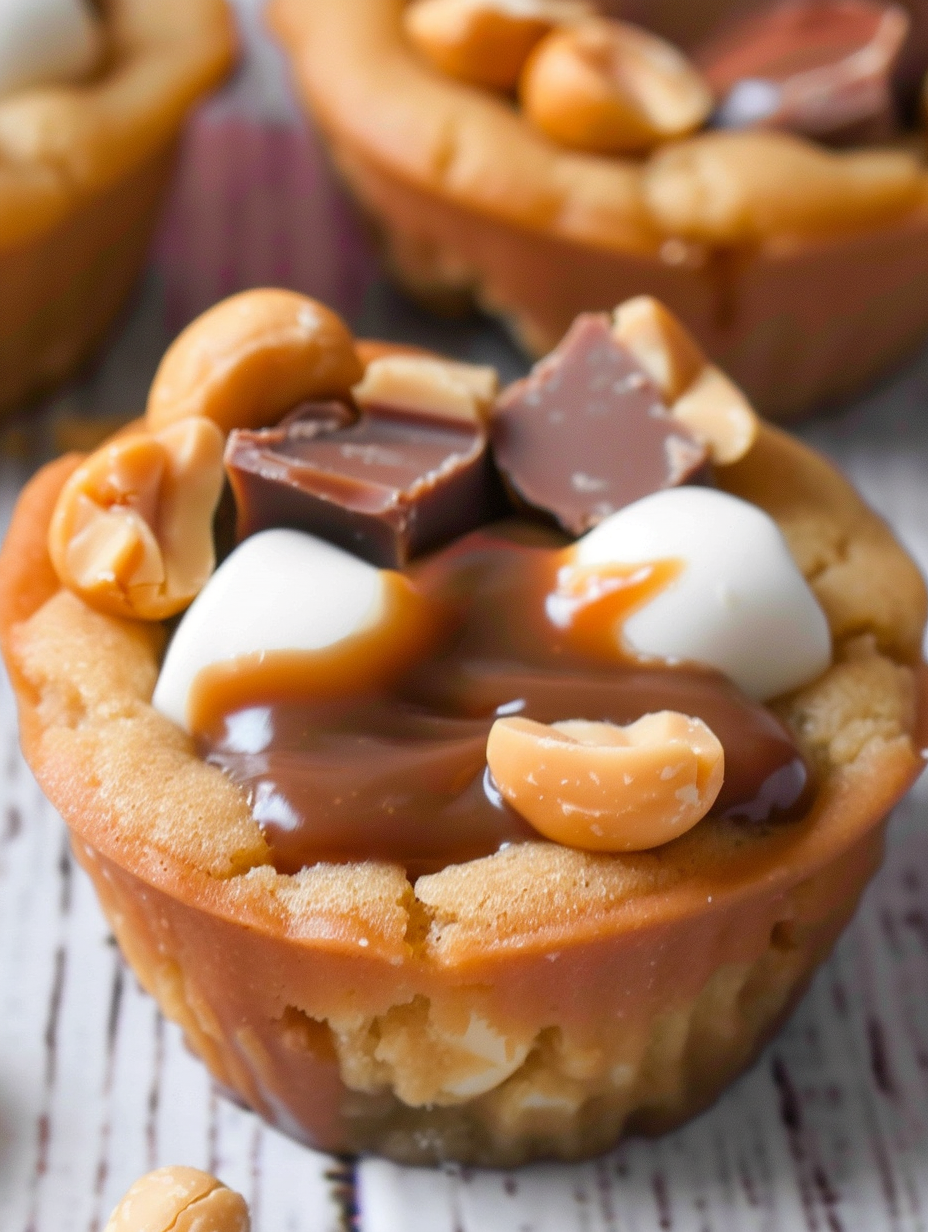
You Must Know
- These hold well at room temperature for a day in an airtight container and keep in the refrigerator for up to 5 days.
- Freeze unfilled baked shells for up to 3 months; thaw and fill on the day you plan to serve for best texture.
- High in calories and fat per serving — each cup contains approximately 420 kcal, 23 g fat and 49 g carbs, so portion accordingly if serving for a crowd.
- Contains common allergens: peanuts, dairy, eggs, wheat and soy from chocolate; not suitable for guests with those allergies.
- For even bake results, rotate the muffin tin halfway through the first bake if your oven has hot spots.
My favorite part is the finish-bake step: seeing the white chocolate and classic minis soften and meld with the caramel while the cookie edge crisps is pure satisfaction. At holiday gatherings I’ll make two batches — one with white chocolate and one with dark chocolate minis — and the variation invites conversation and opinions. These little cups have become a signature for casual gatherings because they’re so reliably popular.
Storage Tips
Store cooled cookie cups in an airtight container. At room temperature they keep for 24–48 hours with minimal change in texture; refrigeration extends shelf life to about 5 days but can firm the caramel and chocolate. For longer storage, freeze single layers on a tray until firm, then transfer to a freezer-safe bag for up to 3 months. To reheat, bring to room temperature or warm in a low oven (275°F) for 5–7 minutes to refresh the caramel softness.
Ingredient Substitutions
If you need to avoid dairy, swap the butter for non-hydrogenated margarine and choose dairy-free caramels and chocolates; texture will be slightly different but still delicious. To make these gluten-free, substitute a 1-to-1 gluten-free all-purpose flour blend and chill the dough briefly if it feels too soft. For nut-free adaptations, replace peanut butter with sunflower seed butter and use allergy-friendly mini chocolates, though the final flavor will be sunflower-forward rather than peanut-forward.
Serving Suggestions
Serve warm or at room temperature; these are lovely alongside coffee or as a dessert platter with fresh fruit to cut the richness. Garnish with a light drizzle of melted chocolate or a sprinkle of flaky sea salt for contrast. They pair well with cold milk for kids or a robust espresso for grown-up gatherings.
Cultural Background
Peanut butter and caramel combinations are a distinctly American comfort flavor profile, inspired by classic candy bars and diner desserts. The idea of baking cookie cups and filling them draws on a long tradition of bite-sized American sweets that combine multiple textures; think tartlet shells filled with ganache or cream, translated here into a homestyle candy-filled treat influenced by peanut butter cup candies.
Meal Prep Tips
For efficient prep, make the dough the day before and refrigerate. On the event day, press into muffin tins and bake; fill immediately after the initial bake. If assembling a large batch, bake in two pans and keep extras in the fridge until just before the finish-bake step to ensure the candies soften evenly.
These Caramel Peanut Butter Cookie Cups are approachable, show-stopping and nostalgic — a dessert that invites conversation and second helpings. I hope they become a repeat favorite in your kitchen as they are in mine.
Pro Tips
Soften caramels slightly in the microwave for 5–8 seconds if they are very firm before placing them in the cups to ensure even melting.
Grease the muffin tin generously and allow cookie cups to cool 15 minutes in the pan to prevent breaking when unmolding.
Use room-temperature eggs and butter for a more even emulsion and consistent dough texture.
If dough seems too sticky, chill for 15 minutes to make pressing into cups easier without adding extra flour.
This nourishing caramel peanut butter cookie cups recipe is sure to be a staple in your kitchen. Enjoy every moist, high protein slice — it is perfect for breakfast or as a wholesome snack any time.
Tags
Caramel Peanut Butter Cookie Cups
This Caramel Peanut Butter Cookie Cups recipe makes perfectly juicy, tender, and flavorful steak every time! Serve with potatoes and a side salad for an unforgettable dinner in under 30 minutes.
Ingredients
Dough
Fillings
Toppings
Instructions
Preheat and prepare pan
Preheat oven to 350°F and grease a 24-cup muffin tin thoroughly with baking spray or softened butter to ensure easy removal later.
Cream butter and sugars
In a large bowl, use an electric mixer to cream together the softened butter, peanut butter, brown sugar and granulated sugar until light and fluffy, about 2–3 minutes.
Add eggs and vanilla
Beat in eggs one at a time followed by vanilla, mixing until incorporated and the mixture appears glossy.
Combine dry ingredients
Whisk flour, baking powder and salt together and add gradually to the wet mixture on low speed until just combined; avoid overmixing.
Form cookie cups
Dollop about 2 tablespoons of dough into each muffin cavity and press to form a shallow cup with slightly higher edges using your fingers.
First bake
Bake for 11–13 minutes, until edges begin to brown and centers are slightly underbaked; this prevents overbrowning after adding fillings.
Fill and finish baking
Remove from oven, place one unwrapped caramel in each cup, press gently, add two chocolate minis and two white chocolate minis on top, sprinkle with peanuts, then return to oven for 5 minutes.
Cool and unmold
Cool in the pan for about 15 minutes to allow caramel and cookie to set, then loosen edges and transfer cups to a wire rack to cool completely before serving.
Last Step: Please leave a rating and comment letting us know how you liked this recipe! This helps our business to thrive and continue providing free, high-quality recipes for you.
Nutrition
Did You Make This?
Leave a comment & rating below or tag
@flavest on social media!
Categories:
You might also like...

Glazed Apple Cider Donuts
Warm-spiced apple cider donuts with tender apple bits and a glossy cider glaze, fried crisp and irresistibly cozy for fall.

Slow Cooker Pork Pot Roast
All-day slow cooking turns pork shoulder, potatoes, and carrots into a tender, savory classic with a rich homemade gravy everyone will love.

Cheesy Hamburger Potato Casserole
Tender layers of Yukon gold potatoes with seasoned beef in a creamy, cheddar sauce, baked until bubbly and irresistibly comforting.
Did You Make This?
Leave a comment & rating below or tag @flavest on social media!
Rate This Recipe
Share This Recipe
Enjoyed this recipe? Share it with friends and family, and don't forget to leave a review!
Comments (1)
This recipe looks amazing! Can't wait to try it.
Comments are stored locally in your browser. Server comments are displayed alongside your local comments.

Hi, I'm Maria!
What's Popular

30-Minute Meals!
Join to receive our email series which contains a round-up of some of our quick and easy family favorite recipes.