
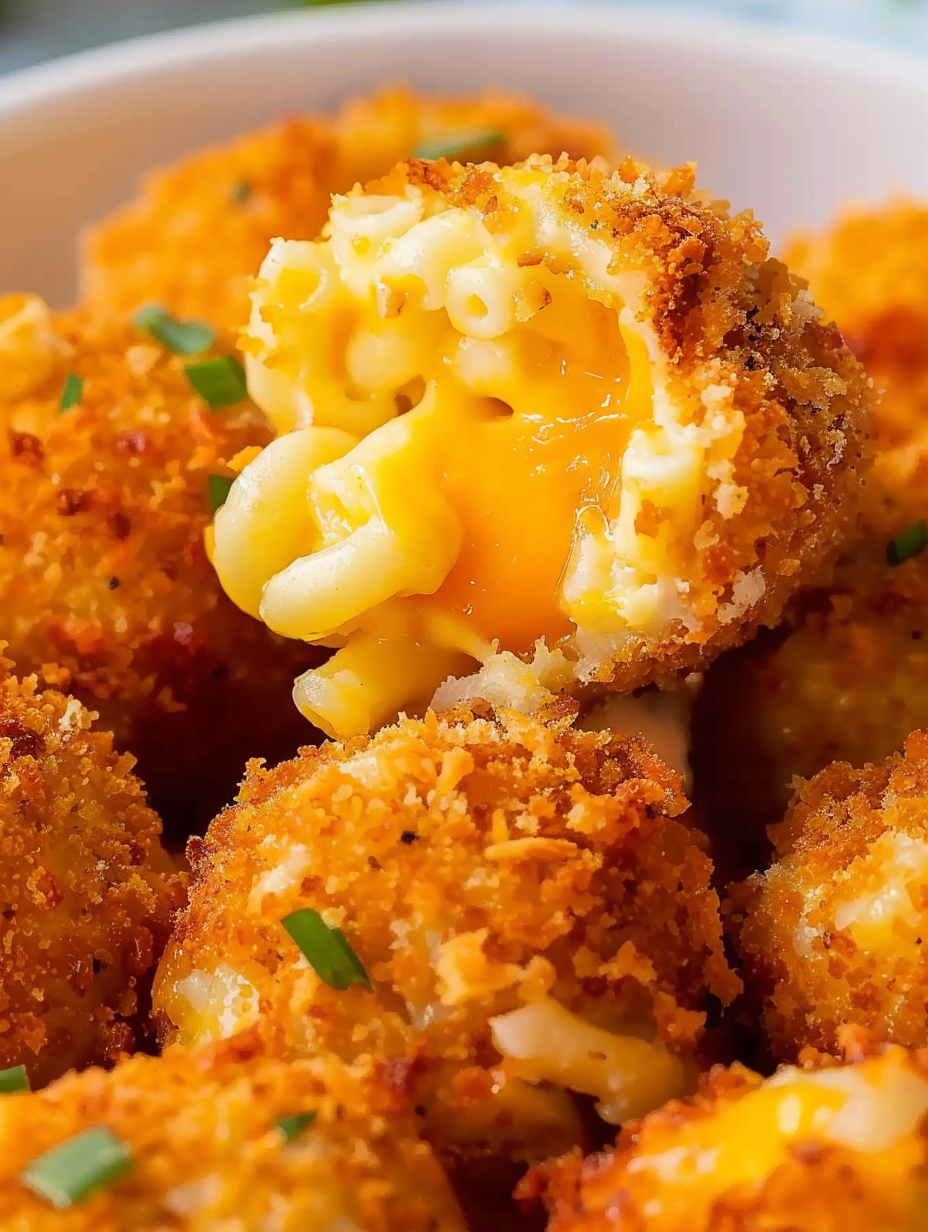
Crispy Mac and Cheese Balls

Leftover macaroni transforms into golden, crunchy bites—crispy on the outside and oozy-cheesy inside. Perfect for parties, snacks, or a fun weeknight treat.
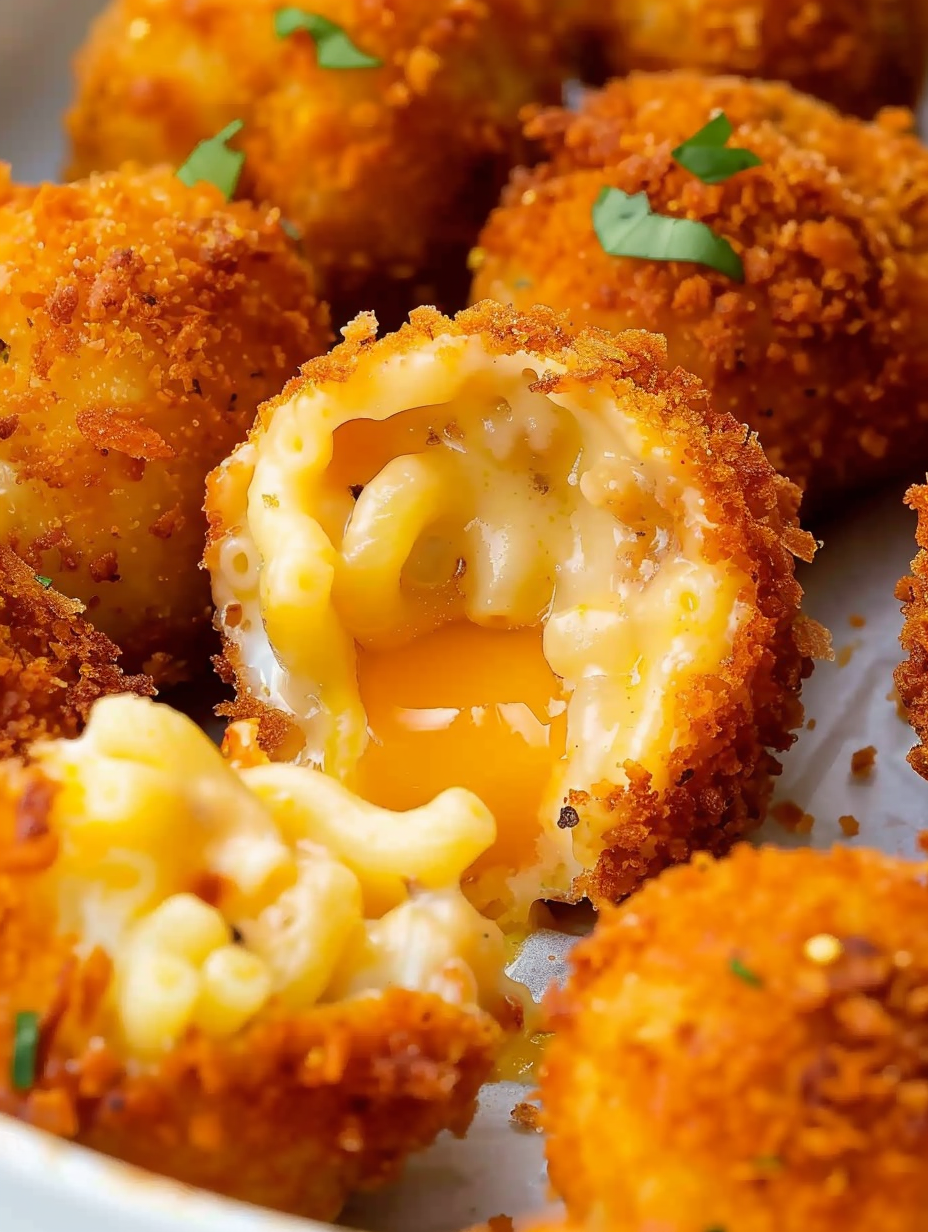
This recipe exists because of a food-love problem: leftover macaroni that begged for a second life. I first turned cold, slightly congealed mac and cheese into crispy spheres on a rainy Saturday when guests spontaneously arrived. The result was a small triumph — crunchy exterior, molten cheese core, and the sort of comfort that makes everyone reach for another. The technique is simple but specific: chill the pasta, firm it up with extra cheese if needed, and coat generously in panko before frying at the right temperature. The little details are what keep the center intact and create that satisfying crack when you bite in.
Mac and cheese balls are the ideal way to celebrate leftovers. They make the most of pantry staples and a few fresh ingredients, producing a snack or appetizer that looks deliberate instead of improvised. I often make a double batch and freeze half for unexpected guests — reheating in hot oil or an air fryer brings them back to near-original glory. Serve them with a tangy dipping sauce or a spicy aioli for contrast. They’re great for potlucks, tailgates, or an indulgent movie night.
Why You'll Love This Recipe
- Uses leftover mac and cheese to make an elevated finger food — no special equipment required and very little extra prep.
- Ready from chilled to plate in about 40 minutes once the paste is cold; active time is short and results are restaurant-quality.
- Panko crust gives superior crunch with less oil absorption compared to regular crumbs, keeping bites light and crisp.
- Customizable: add bacon, herbs, or hot sauce to the mix; make them vegetarian-friendly by skipping meat add-ins.
- Freezable and make-ahead friendly — form, freeze, and fry straight from the freezer for party-ready snacks.
- Great for kids and adults alike — handheld comfort food that pairs with a wide range of dipping sauces.
In my kitchen this moved from a one-off experiment to a household favorite within a week. Family members started requesting the crispy bites at gatherings, and I learned small tricks — like rinsing pre-shredded cheese or chilling longer — that made a big difference. The first time a guest described them as "like a grown-up mozzarella stick" I laughed, but the comparison stuck: melty interior wrapped in golden crunch.
Ingredients
- Leftover mac and cheese (1 lb): Chilled and firm is best. If yours is still soft, stir in a little extra cheddar to bind. Homemade or store-bought both work; cool completely in the refrigerator to tighten the texture.
- Sharp cheddar (1 cup shredded): Adds body and melt. I prefer an aged sharp cheddar for flavor — Cabot or Tillamook are reliable brands. Freshly grated melts smoother than pre-shredded.
- Parmesan (1 cup shredded): Adds umami and a slightly granular texture that helps the center firm up. Use Parmigiano-Reggiano if possible for depth.
- Eggs (2): Bind the coating and give the breadcrumbs something to cling to. Large eggs are standard.
- Milk (3 tablespoons): Thins the egg wash just enough for an even dip. Whole milk improves flavor and browning.
- Panko breadcrumbs (2 cups): Use Japanese-style panko for maximum crunch. If you only have regular breadcrumbs, mix in some crushed crackers or additional panko.
- Oil for frying: Neutral oils with high smoke points, such as vegetable, canola, or peanut oil. You’ll need enough to deep-fry; about 4 to 6 cups depending on your pot.
Instructions
Chill the mac and cheese: Place the leftover macaroni in the refrigerator for at least 3 to 4 hours, or overnight if you can. Cooling firms the sauce so the pasta holds its shape when scooped. If you’re short on time, spread it in a shallow pan and freeze until just firm (about 45–60 minutes). Enrich and evaluate texture: Transfer the chilled mac and cheese to a large bowl. Stir in the shredded cheddar and parmesan; add more cheese until the mixture is dense enough to shape. The ideal consistency is cohesive and slightly tacky but not wet—if it’s still loose, additional grated cheese or a tablespoon of flour can help. Prepare the coating station: In a shallow bowl, whisk the eggs with milk to create an egg wash. In another shallow bowl, spread the panko breadcrumbs. Keep a clean baking sheet lined with parchment nearby for the formed balls. Form the balls: Using an ice cream scoop or your hands, shape portions into balls roughly 1 1/4 to 1 1/2 inches in diameter. Press gently to compact — this helps them hold together during frying. Place each ball on the parchment-lined tray. Coat thoroughly: Dip each ball first into the egg wash, letting any excess drip off, then roll in panko until fully coated. For an extra-secure shell, double-dip: back into the egg wash and panko once more. Return the coated balls to the tray and refrigerate for at least 30 minutes to help the coating set. Heat the oil and fry: Heat 3 to 4 inches of oil in a Dutch oven or heavy pot to 350°F. Use a candy or deep-fry thermometer to monitor. Fry in small batches (3–5 balls at a time) so the oil temperature stays steady. Cook about 3 to 4 minutes per batch until golden brown and crispy, turning if necessary. Drain on paper towels. Serve immediately: Serve hot with dipping sauces such as spicy ketchup, sriracha mayo, or a tangy ranch. If making ahead, reheat in a 375°F oven for 8–10 minutes or in an air fryer at 350°F for 4–6 minutes.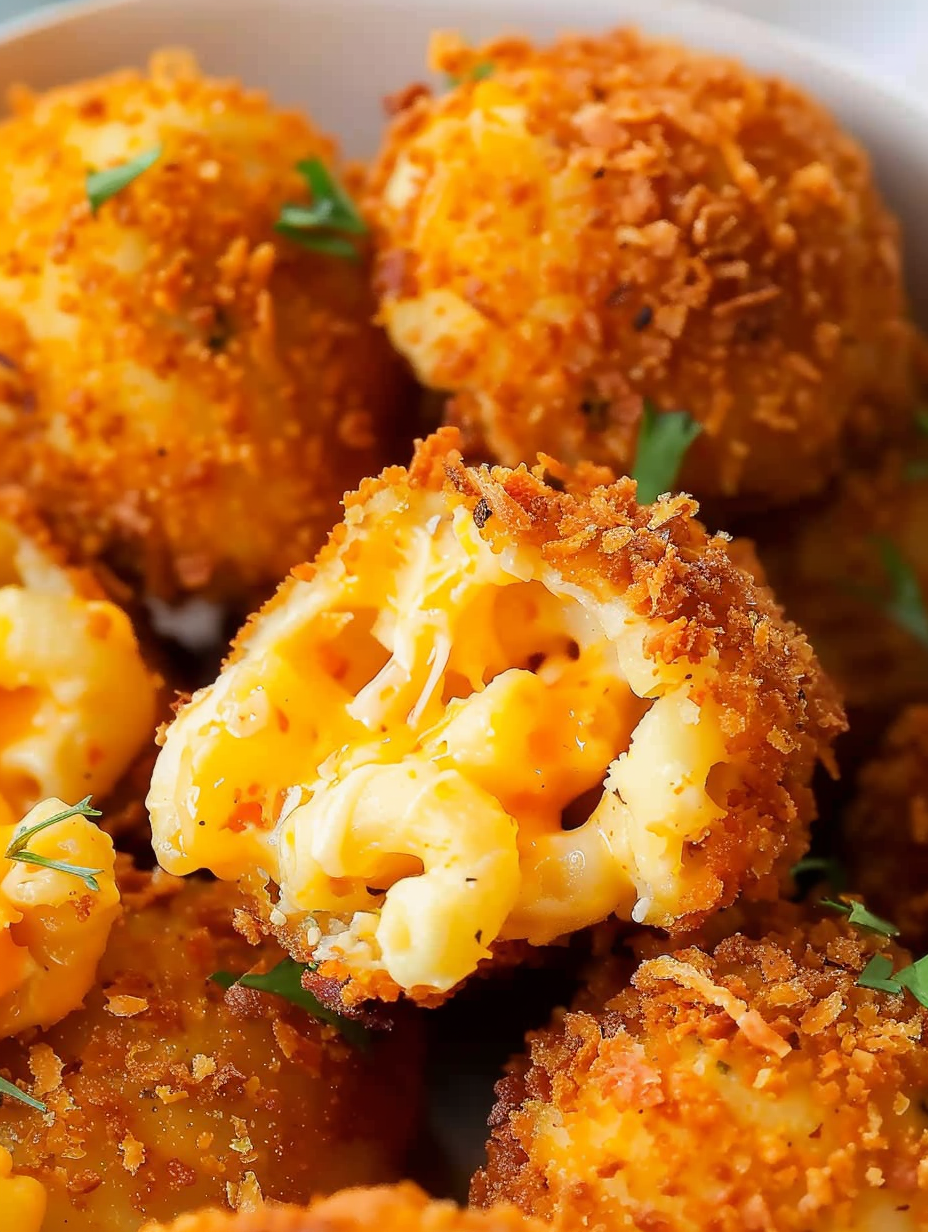
You Must Know
- Chill the pasta thoroughly — this is non-negotiable for forming neat balls that won’t burst while frying.
- Use panko for a lighter, airier crust that resists oil absorption and stays crisp longer.
- Maintain oil temperature at 350°F; frying too cool makes them greasy, too hot risks a burnt shell and undercooked center.
- Frozen formed balls can be fried directly from the freezer; add a minute or two to the fry time.
- High in calcium and protein from cheese, but also energy-dense — enjoy as an occasional treat or party snack.
My favorite part is the contrast: the audible crack of the golden crust followed by a ribbon of molten cheese. Once, at a birthday spread, guests polished off a dozen within minutes. The recipe’s balancing act — temperature, coating, and chilling — is simple once you know the cues: compact balls, steady oil, and an even golden color.
Storage Tips
Store formed but unfried balls in a single layer on a baking sheet lined with parchment and freeze until solid, then transfer to a freezer-safe bag for up to 3 months. For refrigerated storage, keep cooked bites in an airtight container for up to 3 days; to retain crispness, re-crisp in an air fryer or a preheated 375°F oven for 6–10 minutes rather than microwaving. If freezing after frying, flash-cool on a rack, then freeze in a single layer before bagging to prevent sogginess.
Ingredient Substitutions
If you need gluten-free options, substitute gluten-free panko or crushed certified gluten-free crackers and ensure the pasta was gluten-free to begin with. For dairy-free adaptations, use a vegan mac and cheese base and dairy-free shredded cheeses that melt well; results will vary by brand — Daiya and Violife perform reasonably, though texture differs from dairy cheese. For a lower-fat option, bake instead of frying at 425°F for 15–20 minutes, flipping halfway; the exterior won’t be identical, but flavor remains comforting.
Serving Suggestions
Present these on a wooden board with small bowls of dipping sauces: chipotle mayo, honey mustard, marinara, and ranch. Pair with crisp pickles or a bright slaw to cut through richness. For a main-course pairing, serve alongside a peppery arugula salad and roasted vegetables. Garnish with chopped chives or smoked paprika for color and a subtle aromatic lift.
Cultural Background
Transforming leftover food into new forms is a global instinct; these bites owe their spirit to comfort-food traditions where starch and cheese are beloved. While mac and cheese is a Southern American classic, the concept of breading and frying cheesy morsels crosses cultures — think Italian arancini or Japanese korokke. These mac-and-cheese spheres are a modern, playful take on that lineage, combining the creamy American casserole with universal frying techniques.
Seasonal Adaptations
Summer: fold in roasted corn and chopped jalapeño for brightness and a hint of heat. Fall: stir in cooked butternut squash puree and sage for an autumnal twist, using a blend of cheddar and Gruyère. Winter holidays: add crumbled cooked bacon and a pinch of smoked paprika, serving with cranberry mustard for a festive contrast. Each swap modifies moisture and binding, so adjust the extra shredded cheese as needed to maintain form.
Meal Prep Tips
Make the mac and cheese one day ahead and chill overnight to allow flavors to meld and the sauce to firm. Form and coat the balls the next day; refrigerate for at least 30 minutes before frying. For grab-and-go lunches, freeze cooked balls individually and pack two with a small dipping container; reheat in an air fryer for 5–7 minutes. Save time by setting up a coating station to work assembly-line style — one person scoops, another coats, another fries.
These golden bites are both humble and celebratory, a tiny reminder that leftovers can become the star. Whether you’re feeding a crowd or elevating a snack, they deliver nostalgia, texture, and a seriously cheesy pull that never fails to please. Make them your own and enjoy the inevitable praise.
Pro Tips
Chill the mac and cheese thoroughly — this makes shaping easier and prevents bursting during frying.
Use panko for a crisp, light crust and keep the oil at a steady 350°F for best results.
Double-dipping (egg wash + panko twice) helps create a more secure shell and reduces breakage.
Grate cheese fresh when possible; pre-shredded cheeses often contain anti-caking agents that affect melting.
Work in small batches to avoid oil temperature drops that make soggy, greasy shells.
This nourishing crispy mac and cheese balls recipe is sure to be a staple in your kitchen. Enjoy every moist, high protein slice — it is perfect for breakfast or as a wholesome snack any time.
FAQs about Recipes
Can I freeze the balls before frying?
Yes. Chill the mac and cheese until firm, then form and freeze the balls on a tray. Transfer to a bag for long-term freezing and fry from frozen, adding 1–2 minutes to the fry time.
What if the mac mixture is too runny to form?
If they are too soft, add more shredded cheese to firm the mixture. Panko and a proper chill are essential for shaping.
Tags
Crispy Mac and Cheese Balls
This Crispy Mac and Cheese Balls recipe makes perfectly juicy, tender, and flavorful steak every time! Serve with potatoes and a side salad for an unforgettable dinner in under 30 minutes.
Ingredients
Main
Binder & Coating
Frying
Instructions
Chill the mac and cheese
Refrigerate the leftover mac and cheese for at least 3 to 4 hours, or overnight. Cooling firms the sauce and allows easier shaping. Spread into a shallow pan to speed chilling if necessary.
Enrich and check texture
Place the chilled mac and cheese in a large bowl and stir in shredded cheddar and parmesan. Add more cheese until the mixture is dense enough to roll; it should be cohesive and slightly tacky but not wet.
Set up coating station
Whisk the eggs and milk in a shallow bowl to make an egg wash. Place panko breadcrumbs in another bowl. Line a baking sheet with parchment for the formed balls.
Form balls
Use an ice cream scoop or hands to portion the mixture into 1 1/4 to 1 1/2-inch balls, pressing gently to compact. Place on the parchment-lined sheet.
Coat and chill
Dip each ball into the egg wash, then roll in panko to coat. For a stronger crust, double-dip. Refrigerate the coated balls for at least 30 minutes to set the coating.
Fry until golden
Heat oil to 350°F in a Dutch oven. Fry the balls in small batches for 3 to 4 minutes until golden and crisp. Drain on paper towels and serve immediately with dips.
Last Step: Please leave a rating and comment letting us know how you liked this recipe! This helps our business to thrive and continue providing free, high-quality recipes for you.
Nutrition
Did You Make This?
Leave a comment & rating below or tag
@flavest on social media!
Categories:
You might also like...

Glazed Apple Cider Donuts
Warm-spiced apple cider donuts with tender apple bits and a glossy cider glaze, fried crisp and irresistibly cozy for fall.

Slow Cooker Pork Pot Roast
All-day slow cooking turns pork shoulder, potatoes, and carrots into a tender, savory classic with a rich homemade gravy everyone will love.

Cheesy Hamburger Potato Casserole
Tender layers of Yukon gold potatoes with seasoned beef in a creamy, cheddar sauce, baked until bubbly and irresistibly comforting.
Did You Make This?
Leave a comment & rating below or tag @flavest on social media!
Rate This Recipe
Share This Recipe
Enjoyed this recipe? Share it with friends and family, and don't forget to leave a review!
Comments (1)
This recipe looks amazing! Can't wait to try it.
Comments are stored locally in your browser. Server comments are displayed alongside your local comments.

Hi, I'm Maria!
What's Popular

30-Minute Meals!
Join to receive our email series which contains a round-up of some of our quick and easy family favorite recipes.