
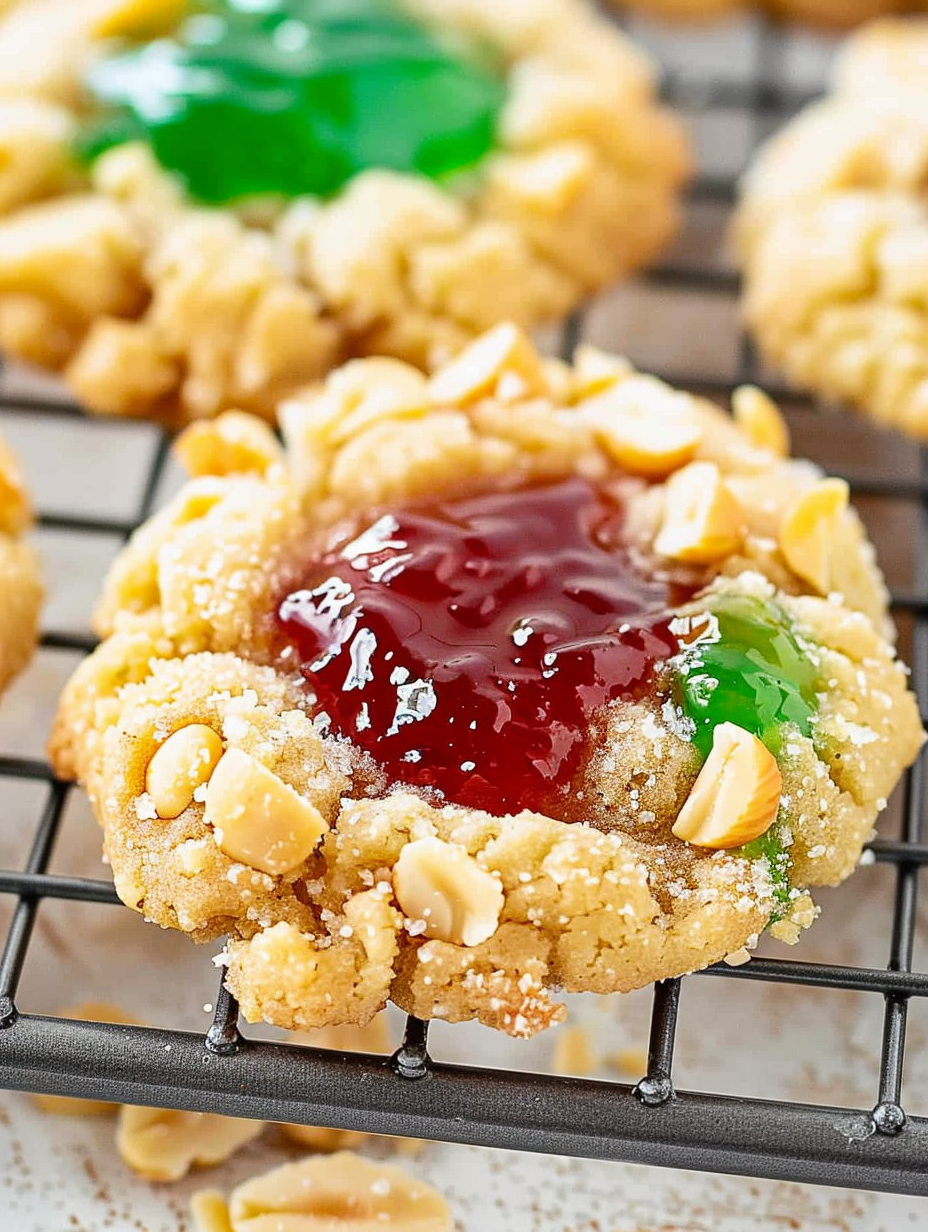
Jelly Thumbprint Cookies (Peanut-Studded Holiday Classics)

Mini shortbread-like cookies rolled in peanuts with a jewel-like dollop of jelly in the center — a nostalgic holiday favorite that's crunchy, buttery and irresistible.
Why You'll Love This Recipe
- These cookies are ready in about 22 minutes total, making them ideal for last-minute trays and weeknight baking. The dough is quick to mix and can be portioned with a tablespoon or cookie scoop for even baking.
- They use pantry-friendly ingredients — butter, flour, sugar, an egg, chopped peanuts and your favorite jelly — so you can usually make them without a special trip to the store.
- The peanut coating adds a satisfying crunch and toasty flavor that balances the tender, buttery base; this version is great for anyone who loves a texture contrast.
- They hold up well at room temperature for several days, which makes them convenient for gifting, cookie swaps, or making ahead for parties.
- Kid-friendly tasks like making the thumbprint and spooning jelly into the center make these a great family baking project that creates memories as much as cookies.
- Make-ahead flexibility: you can form the balls and refrigerate them on a sheet for a few hours before rolling and baking, saving time on the day you need them.
In my family, these cookies always draw comments about the crunchy peanut exterior and how the jelly centers look like little ornaments. Every year someone asks for the recipe; it’s become more than a cookie — it’s a seasonal tradition that marks the start of festive baking.
Ingredients
- Unsalted butter, 1/2 cup (1 stick), softened: Use high-quality butter for the best flavor; I prefer European-style butter for its slightly higher butterfat, but standard unsalted butter works excellently. Softened means it yields to gentle pressure but is not melted.
- Light brown sugar, 1/4 cup, packed: Adds a hint of molasses and chew; the brown sugar keeps the tiny cookies tender and gives a deeper flavor than white sugar alone.
- Egg, 1 large, divided: Reserve the yolk for the dough (adds richness) and the white for sealing the nuts to the dough — this creates a better adhesion than water or milk.
- Almond extract, 1/2 teaspoon: A little goes a long way; it brightens the cookie and pairs beautifully with both peanut and jelly notes. Do not substitute with vanilla at the same measure if you want that almond lift.
- All-purpose flour, 1 cup: Provides structure. Spoon and level for accurate measurement; overpacking can make the dough dry.
- Kosher salt, 1/4 teaspoon: Enhances sweetness and balances the fats; if using table salt, reduce slightly.
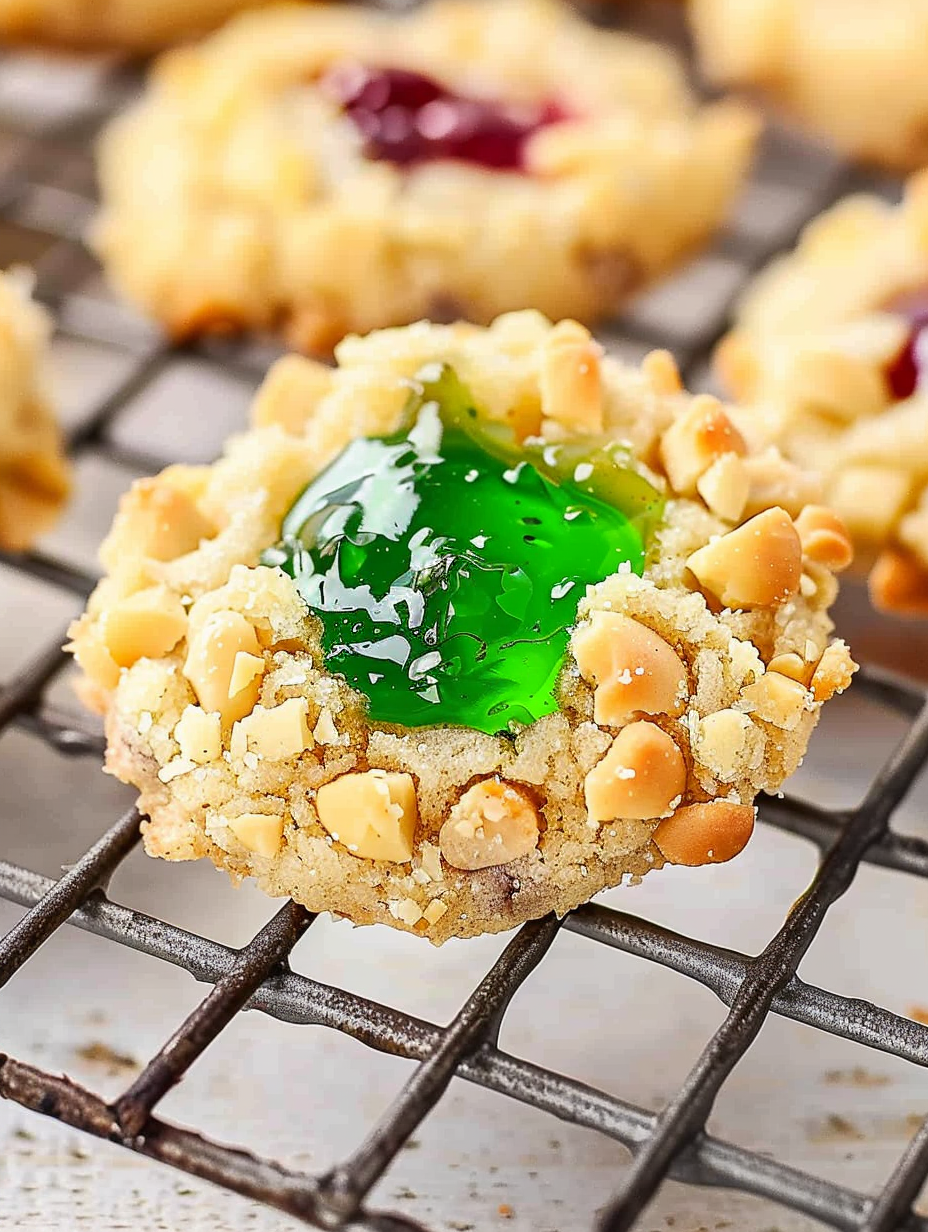
- Chopped peanuts, 1 cup: Finely chopped but not powdered — you want pieces that provide crunch. Dry-roasted or lightly salted peanuts work well; if they’re raw, roast them briefly in a hot skillet for 4–6 minutes until fragrant.
- Red jelly, 3 tablespoons and green jelly, 3 tablespoons: Choose your favorite flavors; raspberry and currant are classic choices. Keep the jelly glossy and smooth for the best presentation.
Instructions
Make the dough: In a large mixing bowl, cream the softened butter and light brown sugar until smooth and slightly airy. Add the egg yolk and almond extract and mix until fully incorporated. Stir in the flour and kosher salt until the dough just comes together — avoid overmixing to keep the texture tender. The dough should be cohesive and soft, not sticky; if too soft, chill for 10 minutes. Shape the cookies: Measure the dough with a tablespoon or a small cookie scoop and roll into 1-inch balls. Place them on a lined baking sheet. In a small bowl whisk the reserved egg white until frothy; spread the chopped peanuts in a separate shallow bowl. Dip each ball into the egg white, then roll in the chopped peanuts, pressing gently so the nuts adhere and form an even coating. Create the thumbprint: Arrange the balls on a parchment-lined sheet with at least 1 inch between cookies. Use your thumb or the back of a teaspoon to gently press an indent in the center of each ball about 1/4 inch deep. Be gentle — pressing too far will flatten the cookie too much and distort the peanut crust. Fill and bake: Fill each indent with about 1 teaspoon of jelly; use a small spoon or a piping bag for precision. Rotate between red and green for a festive look. Bake in a preheated 350°F oven for 12–14 minutes, until the nuts begin to brown and the cookie edges are just set. Watch the first tray closely to dial in your oven time. Cool: Allow the cookies to cool on the baking sheet for 5 minutes to set the jelly, then transfer to a cooling rack to cool completely. Once fully cooled, the jelly will be glossy and firm.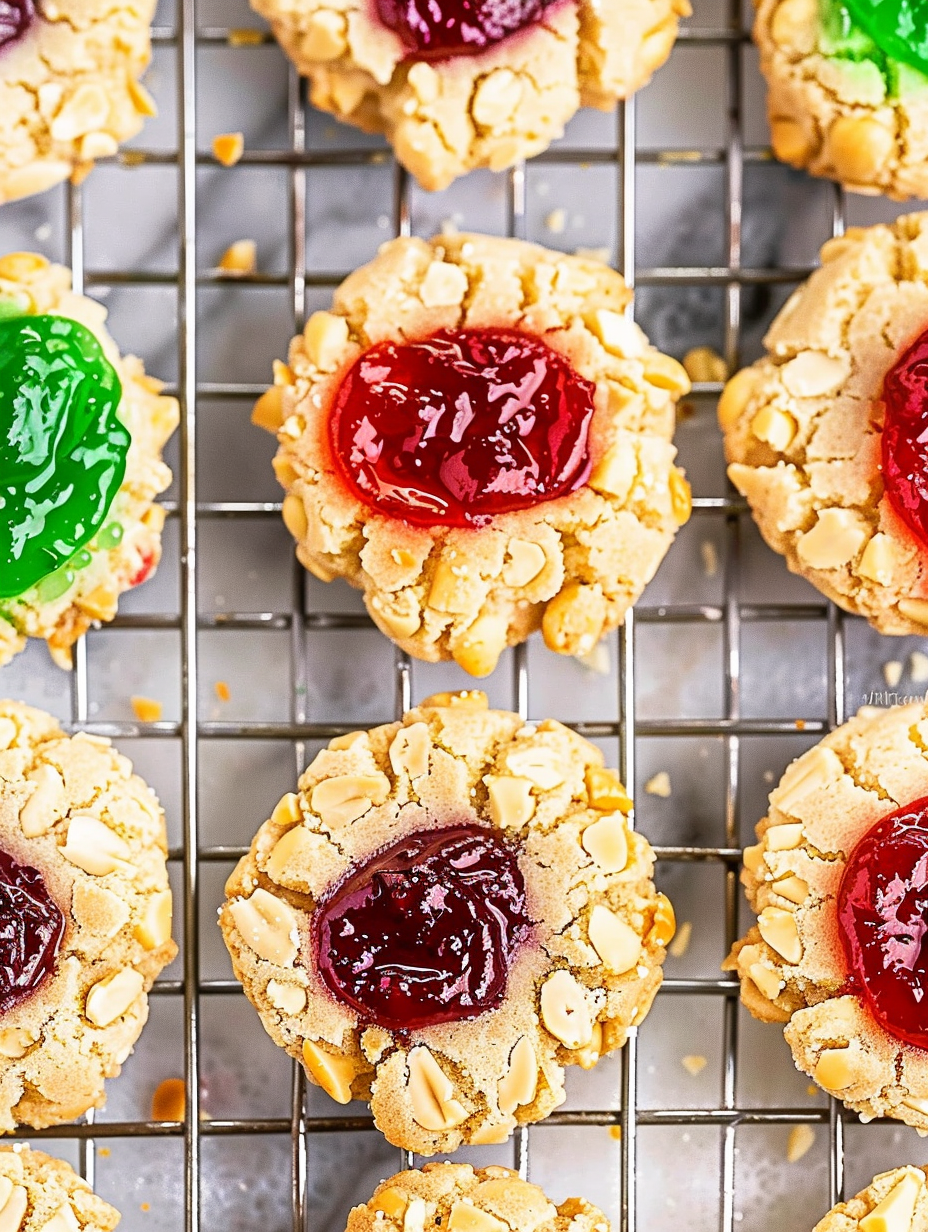
You Must Know
- These keep well at room temperature in an airtight container for about five days; the peanut coating maintains its crunch while the center stays glossy.
- Freeze unbaked dough balls (rolled but not jellied) for up to 3 months. Thaw in the fridge before pressing the thumbprints and baking.
- Each cookie is small and rich; approximately one teaspoon of jelly per cookie prevents overflow and burning at the edges.
- Because the recipe contains eggs, dairy (butter), peanuts and gluten (wheat flour), take allergen precautions when serving to guests.
I love how straightforward these are — little hands can help make the indent and add the jelly, which turns baking into an activity more than a chore. The crunchy peanut rim always earns compliments, and I especially enjoy pairing different jelly flavors on the same tray for a colorful holiday presentation.
Storage Tips
Store completely cooled cookies in a single layer or with parchment between layers in an airtight container at room temperature for up to five days. For longer storage, place in a freezer-safe container and freeze for up to three months; thaw at room temperature before serving. Avoid refrigeration — it can make the cookie crumbly and the jelly cloudy. If you are transporting them, use a sturdy tin and cushion the cookies so the jelly centers stay intact.
Ingredient Substitutions
If you need to avoid dairy, substitute a plant-based butter that melts and behaves like regular butter, but expect a slightly different flavor. For a nut-free version, use finely crushed pretzels or toasted, crushed coconut flakes instead of peanuts. If you need gluten-free, use a one-to-one gluten-free flour blend with xanthan gum for structure. When swapping ingredients, keep ratios the same but watch texture — gluten-free doughs sometimes need a touch less handling and a short chill before shaping.
Serving Suggestions
These cookies are perfect on a holiday platter with gingerbread and spritz cookies. Garnish trays with fresh rosemary sprigs and citrus slices for contrast. They also pair beautifully with black tea or a lightly brewed coffee. Serve warm with the jelly slightly set, or at room temperature for a firmer center. For gift boxes, alternate red and green jellies for visual appeal and add a ribbon and handwritten tag.
Cultural Background
Thumbprint-style treats trace back to European holiday traditions where small shortbread-like cookies were filled with preserves and shared during winter festivals. Over time the basic idea evolved — different regions used local nuts, spices, and preserves. The American adaptation often includes peanut elements simply because of the ubiquity and affordability of peanuts, and the holiday color palette with red and green jelly became popular mid-20th century as seasonal baking traditions solidified.
Seasonal Adaptations
For winter, use cranberry or raspberry jelly for a tart counterpoint to the buttery dough. In summer, swap to apricot or orange marmalade and sprinkle the warm cookies with finely grated lemon zest after baking. For fall gatherings, add 1/4 teaspoon warm spices — cinnamon and a pinch of nutmeg — to the dough and use fig preserves for a deeper flavor. Adjust baking time slightly if you add moist ingredients to the dough.
Meal Prep Tips
Portion dough into balls and flash-freeze them on a tray until firm; once frozen, transfer to a freezer bag. When ready to bake, place frozen balls on a baking tray and add an extra minute or two to the bake time. To streamline a baking day, prepare peanut coating and jellies in advance and set up a simple assembly line: egg white bowl, peanut bowl, baking sheet, and small spoons for jelly. This reduces mess and keeps the process efficient when making multiple batches.
These little cookies are an ode to simple pleasures: buttery dough, toasty nuts and a jewel of jam. They’re quick to make, great for sharing, and endlessly adaptable — make them, share them, and watch them disappear.
Pro Tips
Chill the dough for 10 minutes if it feels too soft to shape; slightly firmer dough is easier to roll and coat.
Whisk the egg white until frothy for the best adhesion between the dough and chopped peanuts.
Use a tablespoon or small cookie scoop to make uniform 1-inch balls, ensuring even baking across the batch.
Toast raw peanuts in a hot skillet for 4–6 minutes until fragrant to enhance flavor before chopping.
Fill the thumbprints with no more than 1 teaspoon of jelly to avoid spillage and burning during baking.
This nourishing jelly thumbprint cookies (peanut-studded holiday classics) recipe is sure to be a staple in your kitchen. Enjoy every moist, high protein slice — it is perfect for breakfast or as a wholesome snack any time.
FAQs about Recipes
Can I freeze the dough?
Yes. You can freeze the unbaked rolled balls (without jelly) for up to 3 months. Thaw in the refrigerator before pressing the thumbprint and baking.
How much jelly should I use?
Use approximately 1 teaspoon of jelly per cookie. Too much will overflow and burn; too little will look sparse.
How should I store the cookies?
Store in an airtight container at room temperature for up to 5 days. For longer storage freeze in a sealed container for up to 3 months.
Tags
Jelly Thumbprint Cookies (Peanut-Studded Holiday Classics)
This Jelly Thumbprint Cookies (Peanut-Studded Holiday Classics) recipe makes perfectly juicy, tender, and flavorful steak every time! Serve with potatoes and a side salad for an unforgettable dinner in under 30 minutes.
Ingredients
Base
Coating & Filling
Instructions
Blend base ingredients
In a large mixing bowl, cream softened butter and light brown sugar until smooth. Add the egg yolk and almond extract, mixing until combined. Add flour and kosher salt and stir until a soft dough forms. If the dough is sticky, chill for 10 minutes.
Portion and roll
Measure dough into 1-inch balls using a tablespoon or small scoop. Place on a parchment-lined baking sheet. Whisk the reserved egg white until frothy and spread chopped peanuts in a separate bowl.
Coat with egg white and peanuts
Dip each ball into the egg white and then roll in chopped peanuts, pressing gently so the nuts adhere to the surface. Return balls to the baking sheet, spaced at least 1 inch apart.
Make thumbprint and fill
Use your thumb or the back of a teaspoon to create an indent about 1/4 inch deep in each dough ball. Spoon about 1 teaspoon of jelly into each center, alternating red and green for a festive look.
Bake and cool
Bake in a preheated 350°F oven for 12–14 minutes, until nuts begin to brown and edges are set. Cool on the baking sheet for 5 minutes, then transfer to a rack to cool completely.
Last Step: Please leave a rating and comment letting us know how you liked this recipe! This helps our business to thrive and continue providing free, high-quality recipes for you.
Nutrition
Did You Make This?
Leave a comment & rating below or tag
@flavest on social media!
Categories:
You might also like...

Glazed Apple Cider Donuts
Warm-spiced apple cider donuts with tender apple bits and a glossy cider glaze, fried crisp and irresistibly cozy for fall.

Slow Cooker Pork Pot Roast
All-day slow cooking turns pork shoulder, potatoes, and carrots into a tender, savory classic with a rich homemade gravy everyone will love.

Cheesy Hamburger Potato Casserole
Tender layers of Yukon gold potatoes with seasoned beef in a creamy, cheddar sauce, baked until bubbly and irresistibly comforting.
Did You Make This?
Leave a comment & rating below or tag @flavest on social media!
Rate This Recipe
Share This Recipe
Enjoyed this recipe? Share it with friends and family, and don't forget to leave a review!
Comments (1)
This recipe looks amazing! Can't wait to try it.
Comments are stored locally in your browser. Server comments are displayed alongside your local comments.

Hi, I'm Maria!
What's Popular

30-Minute Meals!
Join to receive our email series which contains a round-up of some of our quick and easy family favorite recipes.