
Martha Washington Candies

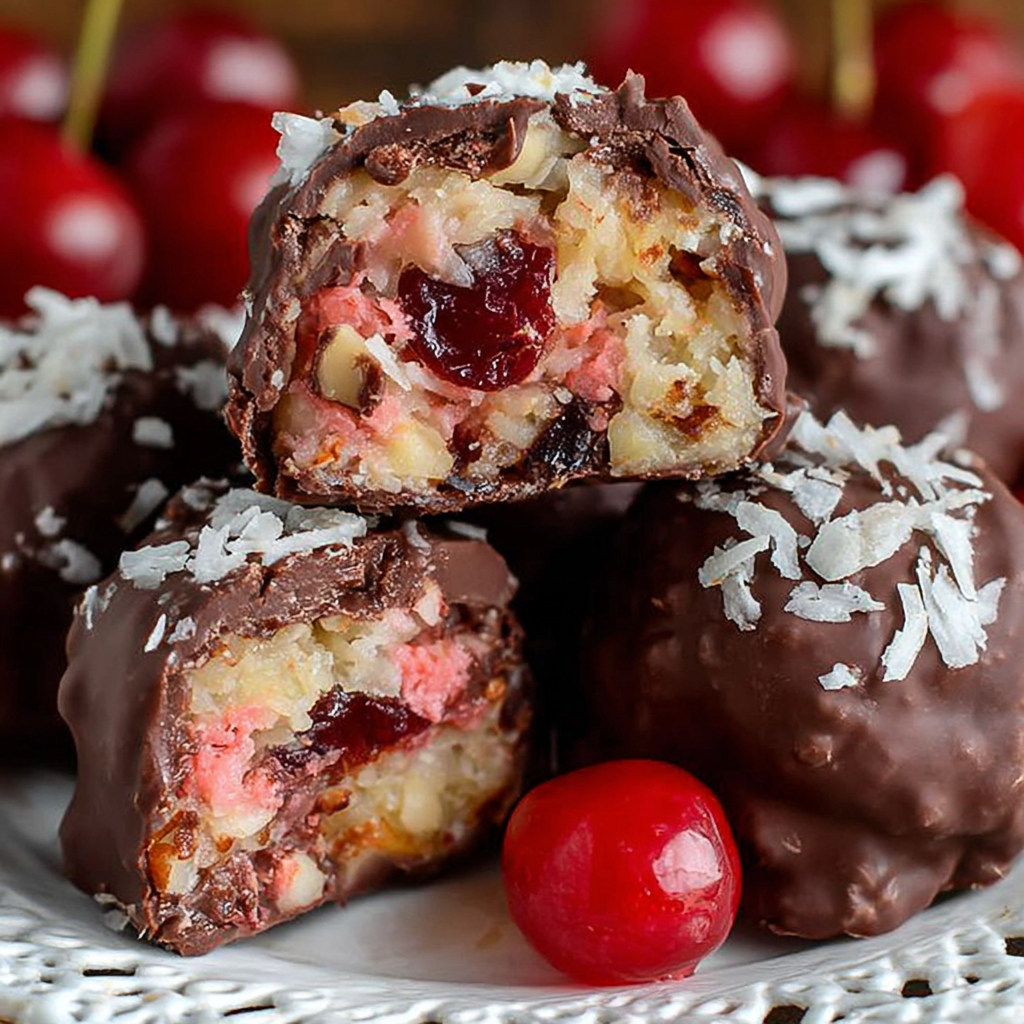
Old-fashioned Martha Washington candies—chewy coconut, tart cherries and toasty pecans enrobed in chocolate—an easy holiday classic perfect for gifting and cookie trays.
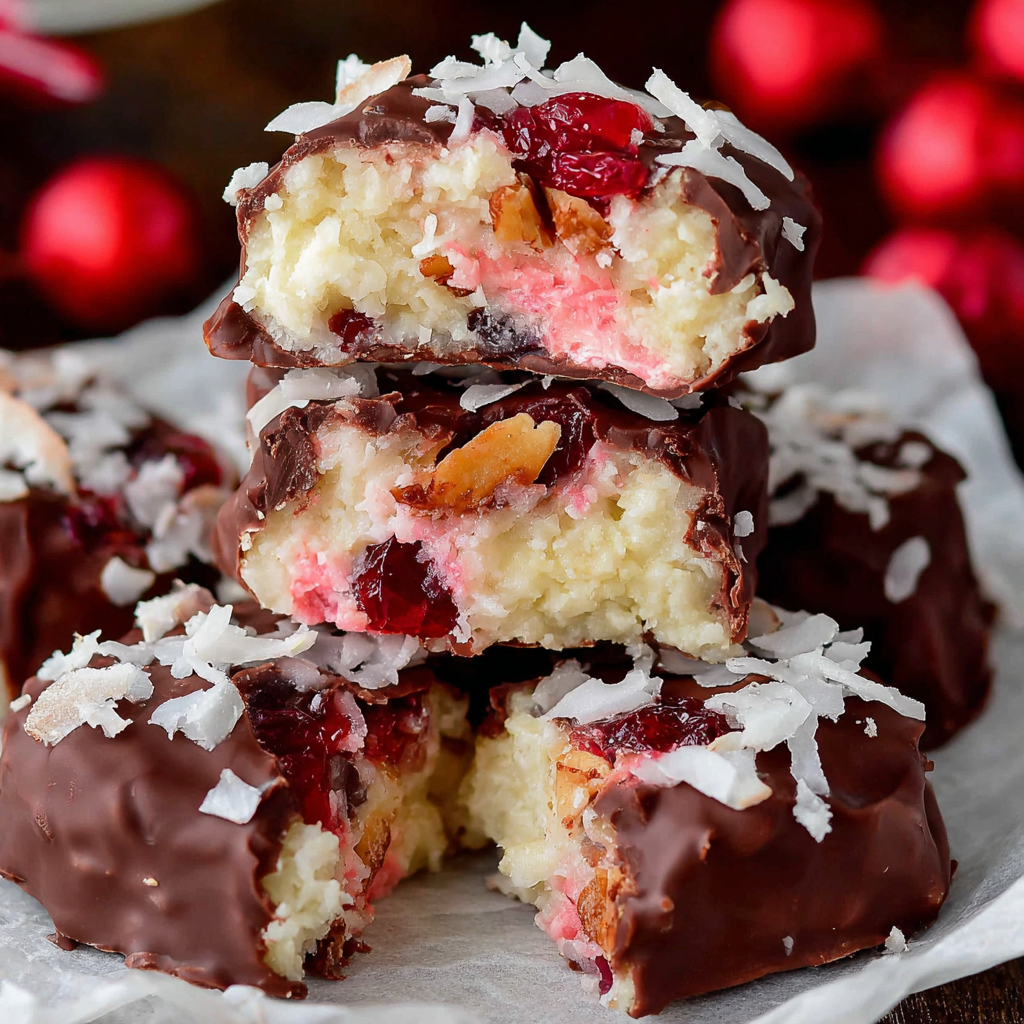
This recipe for Martha Washington candies has been a holiday mainstay in my kitchen for years. I first tasted these hand-dipped treats at a neighbor's Christmas open house and immediately scribbled down the ingredients, determined to recreate the nostalgic chew and nutty crunch at home. The combination of sweetened shredded coconut, toasted pecans, and bright maraschino cherries bound together with a buttery, sweet filling and covered in chocolate is deceptively simple. Each bite balances chewy, crunchy, and smooth textures, with the cherries adding a surprising pop that feels festive and old-fashioned.
I began making this batch the December after I had my first child—between naps I would melt wafers and dip small walnut-sized balls, lining them up on parchment while holiday music played. They quickly became the candy we handed out to neighbors and included on cookie trays for school parties. What makes them special is how approachable the method is: no tempering required, a small number of pantry-friendly ingredients, and a result that looks far more impressive than the effort required. Once you make them you’ll notice how well they travel, how forgiving they are to size variations, and how quickly they disappear at gatherings.
Why You'll Love This Recipe
- Classic holiday flavor profile that combines chewy coconut, crunchy pecans and a tart cherry note—familiar yet nostalgic, perfect for holiday trays and cookie exchanges.
- Quick active time: about 15 minutes of hands-on work to mix and shape; chilling and setting happen passively, so you can prep ahead when time is tight.
- Uses pantry staples and a single bag of melting wafers or almond bark for coating—no chocolate tempering skills required.
- Excellent for gifting: holds shape and travels well when stored in an airtight tin; makes approximately 60 bite-sized pieces depending on size.
- Flexible for dietary tweaks—swap nuts or skip cherries for a simpler version; all substitutions and ratios provided below so you won’t lose texture or flavor.
I’ve gifted these to friends and brought them to potlucks; people always ask for the recipe. My mom calls them “the candies that look fancy,” and my son insists we save a few uncoated balls for a sneaky bite mid-dipping. The reactions are the best part—these are the kinds of sweets that prompt stories about grandmother’s kitchens and holiday rituals.
Ingredients
- Butter (1 cup, melted): Choose unsalted butter and melt slowly so it doesn’t separate. Butter adds richness and helps the filling set. I prefer a European-style butter like Kerrygold for depth of flavor, but any unsalted block will work.
- Powdered sugar (1 pound): Provides structure and sweetness. Sift if it’s clumpy for a smoother texture. The fine milled sugar blends easily with the butter for a uniform dough.
- Vanilla extract (1 tablespoon): Use pure vanilla if possible; it gives aromatic warmth that brightens the candy without overpowering the coconut and cherries.
- Shredded coconut, sweetened (14 ounces): Sweetened desiccated coconut offers chew. Look for medium shredding (not too large) so the balls form evenly. Toasting is optional but adds a toasty note.
- Sweetened condensed milk (14 ounces): Acts as binder and adds a creamy, caramel-like sweetness and chew. Use a standard 14-ounce can.
- Maraschino cherries (10 ounces, drained & chopped): Chop finely and blot dry to avoid excess moisture. The cherries contribute color and those little pops of fruity acidity.
- Pecans (3 cups, finely chopped): Lightly toast and chop finely so they distribute through the filling and create a pleasing crunch without shredding the balls apart.
- Candy coating (16 ounces): Use melting wafers such as Ghirardelli melting wafers, almond bark, or a good-quality candy coating for a glossy, easy-to-dip finish. Choose chocolate or white chocolate wafers per your preference.
Instructions
Prepare the cherries: Drain 10 ounces of maraschino cherries and chop them into small pieces. Place the chopped cherries on a stack of paper towels and gently blot to remove excess syrup. Removing moisture is crucial—too much liquid will make the filling sticky and prevent it from setting properly. Mix the filling: In a large bowl combine 1 cup melted butter, 1 pound powdered sugar, 1 tablespoon vanilla extract, 14 ounces shredded sweetened coconut, 14 ounces sweetened condensed milk, the drained chopped cherries, and 3 cups finely chopped pecans. Fold gently but thoroughly until everything is evenly incorporated—aim for a cohesive, slightly tacky mixture that holds together when pressed. Chill the mixture: Cover the bowl and refrigerate the mixture for at least two hours. Chilling firms up the fat and makes scooping and rolling easier; the colder the filling, the quicker the chocolate coating will set and the neater your candies will look. Form into balls: Using a small scoop or your hands, form the chilled filling into walnut-sized balls (about 1 inch). Place them on a parchment-lined baking sheet and return to the refrigerator for 20 minutes—this extra chill step helps them hold shape during dipping. Melt the coating: Line a baking sheet with fresh parchment. Melt 16 ounces of candy coating according to package directions—either in short bursts in the microwave (stirring between bursts) or over a double boiler. Keep the coating smooth and at dipping consistency, not too hot. Dip and set: Working quickly, dip each chilled ball into the coating with dipping tools or a fork, tapping off excess so coating doesn't pool on the bottom. Place dipped candies back on the lined baking sheet. If excess pools too much, use a small offset spatula to tidy the bottom before it fully sets. Repeat until all pieces are covered. Store: Allow the coating to set completely at room temperature. Store finished candies in an airtight container at room temperature for up to two weeks. For longer storage, freeze tightly wrapped layers for up to 3 months.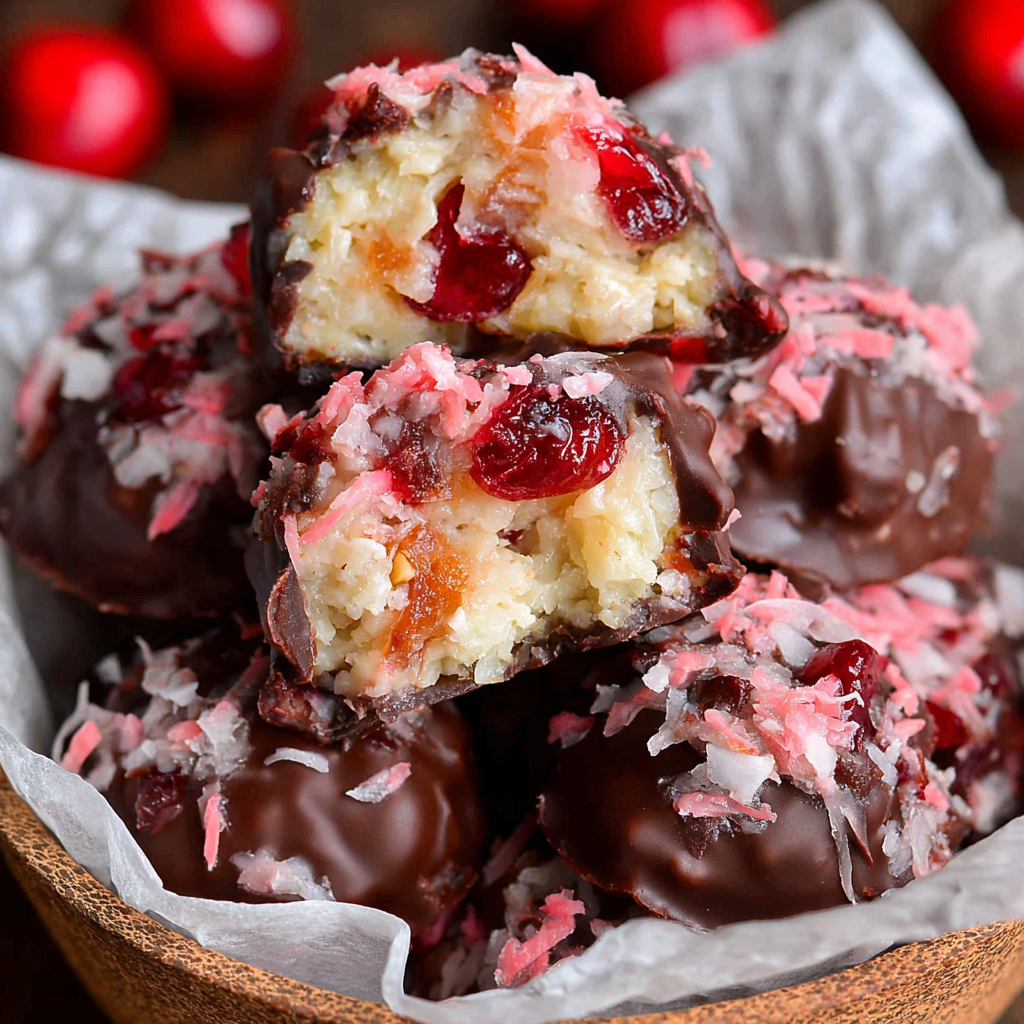
You Must Know
- These are shelf-stable at room temperature for up to 2 weeks when stored airtight; refrigeration will firm the texture but can make the coating slightly dull.
- This candy is relatively high in calories and sugar (about 200 kcal per piece) and contains nuts and dairy—label clearly if gifting to others with allergies.
- Chill the filling thoroughly; dipping cold centers into warm coating is the single best trick to prevent melting or distortion.
- To speed up setting, place the sheet in a cool spot (not the freezer right away) for a few minutes, then allow to finish at room temperature—rapid temperature changes can cause chocolate bloom.
My favorite part is watching them come together on the counter—the spread of colors and textures always draws a crowd. One year I skipped the cherries and added raisins to test a family preference; the cherries won unanimously and now I always keep an extra jar on hand.
Storage Tips
Store the candies in a single layer or with parchment between layers in an airtight container. At room temperature they keep well for two weeks—avoid humid spots or warm kitchens where the coating can soften. For longer storage, freeze in a tightly sealed container for up to three months; thaw in the refrigerator overnight before serving. When transporting, use small tins with parchment to prevent rubbing; if stacking is necessary, separate layers with cupcake liners or wax paper to maintain the glossy coating.
Ingredient Substitutions
If you have nut allergies, substitute the pecans with finely chopped toasted sunflower seeds or use crushed pretzel pieces for a salty contrast (note: pretzels introduce gluten). For a dairy-free version, use vegan butter and a dairy-free condensed milk alternative; also choose a dairy-free candy coating. If you prefer a less sweet result, use unsweetened shredded coconut and reduce powdered sugar by 10–15%, but be aware the texture will be drier so increase condensed milk slightly to compensate.
Serving Suggestions
Arrange the candies on a festive tray with doilies or in small paper candy cups for a polished presentation. They pair beautifully with coffee, black tea, or a nutmeg-spiced eggnog. For a dessert platter, serve alongside shortbread and spiced cookies; the contrast in textures makes for an inviting selection. Add a sprinkle of coarse sea salt on top of dark chocolate-coated pieces for a grown-up twist.
Cultural Background
Martha Washington candies are a nostalgic American holiday confection, often tied to mid-20th-century home baking traditions. They carry the name of the first First Lady but are not directly linked to historical recipes from the Washington household; rather, the name evokes an old-fashioned, genteel quality. Through the decades the candies have appeared on holiday tables across the United States and have been adapted regionally—some versions include chopped almonds, candied fruit, or different coatings.
Seasonal Adaptations
In winter, substitute chopped glace cherries with dried cranberries plumped in warm water for a tart note. For a summery twist swap the cherries for chopped freeze-dried strawberries and use white chocolate coating with a raspberry drizzle. At holiday time, consider adding a pinch of cinnamon or orange zest to the filling for warming seasonal aromatics that complement the coconut and pecans.
Meal Prep Tips
Prepare the filling up to 3 days in advance and keep it chilled; scoop and shape into balls just before dipping to save time. Alternatively, form and freeze the raw balls on a tray, then store frozen in a sealed bag; dip directly from frozen but expect slightly more condensation—dab frozen centers briefly with a paper towel before dipping. Keep a small warming station for your melting wafers and work in batches to avoid reheating the coating repeatedly, which can cause graininess.
These candies are one of those simple pleasures that feel like a celebration every time you make them. They’re forgiving, transportable, and always welcome on a holiday table. Try making a double batch for gifting—you’ll be glad you did.
Pro Tips
Chill the filling for at least two hours to make shaping and dipping much easier and neater.
Blot maraschino cherries thoroughly to remove excess liquid—moisture will make the filling too soft.
Tap excess coating off each piece and gently scrape the bottom with an offset spatula to avoid large pools.
This nourishing martha washington candies recipe is sure to be a staple in your kitchen. Enjoy every moist, high protein slice — it is perfect for breakfast or as a wholesome snack any time.
Tags
Martha Washington Candies
This Martha Washington Candies recipe makes perfectly juicy, tender, and flavorful steak every time! Serve with potatoes and a side salad for an unforgettable dinner in under 30 minutes.
Instructions
Chop and dry cherries
Drain maraschino cherries and chop finely. Place on paper towels and blot dry to remove excess syrup which can make the mixture too wet.
Combine filling ingredients
In a large bowl, mix melted butter, powdered sugar, vanilla, shredded coconut, sweetened condensed milk, chopped cherries, and chopped pecans until fully combined and tacky.
Chill the filling
Cover and refrigerate the mixture for at least two hours so it firms up and is easy to shape.
Form balls and chill
Scoop about 1-inch walnut-sized portions, roll into balls, place on parchment-lined baking sheet, and refrigerate for 20 minutes to firm again before dipping.
Melt coating
Melt candy coating according to package directions, keeping it smooth and at a dipping consistency; avoid overheating.
Dip and set candies
Dip each chilled ball into the coating, tap off excess, and set on parchment to fully set. Repeat until all candies are coated.
Store properly
Allow coating to set completely then store candies in an airtight container at room temperature for up to two weeks or freeze for longer storage.
Last Step: Please leave a rating and comment letting us know how you liked this recipe! This helps our business to thrive and continue providing free, high-quality recipes for you.
Nutrition
Did You Make This?
Leave a comment & rating below or tag
@flavest on social media!
Categories:
You might also like...

Glazed Apple Cider Donuts
Warm-spiced apple cider donuts with tender apple bits and a glossy cider glaze, fried crisp and irresistibly cozy for fall.

Slow Cooker Pork Pot Roast
All-day slow cooking turns pork shoulder, potatoes, and carrots into a tender, savory classic with a rich homemade gravy everyone will love.

Cheesy Hamburger Potato Casserole
Tender layers of Yukon gold potatoes with seasoned beef in a creamy, cheddar sauce, baked until bubbly and irresistibly comforting.
Did You Make This?
Leave a comment & rating below or tag @flavest on social media!
Rate This Recipe
Share This Recipe
Enjoyed this recipe? Share it with friends and family, and don't forget to leave a review!
Comments (1)
This recipe looks amazing! Can't wait to try it.
Comments are stored locally in your browser. Server comments are displayed alongside your local comments.

Hi, I'm Maria!
What's Popular

30-Minute Meals!
Join to receive our email series which contains a round-up of some of our quick and easy family favorite recipes.