
Olive Focaccia

A moist, golden oil-scented focaccia studded with briny Kalamata olives. No kneading or stand mixer required and ready with just a few simple steps.
This olive focaccia is one of those recipes I return to when I want something effortless yet deeply satisfying. I first made it on a rainy afternoon while I was learning which pantry staples could be coaxed into something comforting and impressive without a lot of fuss. The dough is soft and cloud-like, scented with olive oil and garlic, and every bite offers that contrast of a golden, slightly crisp top and a tender, moist interior. Family and friends always remark on how it tastes homemade in the best possible way, and it has become my go-to when I want a bread that looks artisan but barely demands effort.
I love this method because it strips bread making down to its essentials. There is no kneading and no stand mixer needed. Everything is mixed in one bowl with a spoon, then left to rest. The result is incredibly forgiving: dimples pressed with your fingertips hold the aromatic oil brine so the top becomes glossy and flavorful. I often serve it warm with a bowl of soup or simply tear pieces off at a gathering. Katia's version, which I adapted slightly over time, keeps the focus on quality olive oil and good Kalamata olives for a classic Italian profile.
Why You'll Love This Recipe
- Easy technique that requires only one bowl and a spoon making it perfect for weeknights and beginner bakers. Ready in under two hours including proofing time.
- Uses pantry staples: all-purpose flour, active dry yeast, olive oil and a few simple seasonings so you can bake without a special shopping trip.
- No kneading required. The dough develops structure with a gentle rest which produces a moist crumb and airy pockets when baked.
- Highly versatile. Top with other olives, herbs, or roasted vegetables to adapt to what you have on hand or to suit dietary needs.
- Make-ahead friendly. Bakes beautifully the same day and freezes well for quick reheating over the week.
- Crowd pleaser. Serves as an appetizer, side, or base for simple sandwiches making it ideal for potlucks and casual dinners.
I remember serving a fresh tray straight from the oven at a family brunch once and watching everyone reach for the biggest piece. My niece declared it her new favorite bread and went back for thirds. The combination of glossy oil, brine-soaked dimples, and salty Kalamata olives always sparks the most enthusiastic feedback.
Ingredients
- All-purpose flour: 2 1/2 cups (about 11 ounces or 310 grams). Use a reliable brand such as King Arthur or Bob's Red Mill for consistent results. Level your cup when measuring to match the recipe weight.
- Fine salt: 3/4 teaspoon. Dissolve evenly into the flour to help control yeast activity and build flavor in the crumb.
- Active dry yeast: 1 teaspoon. If using instant yeast, add it directly to the flour and omit the sugar in the activation step.
- Sugar: 1/2 teaspoon. A small amount helps jump-start the yeast without adding noticeable sweetness.
- Warm water: 1 cup plus 3 tablespoons (about 285 ml). Aim for lukewarm, roughly 100 to 110 degrees Fahrenheit to encourage yeast foam.
- Olive oil: 2 tablespoons in the dough plus additional for the pan. Choose a fruity extra virgin olive oil for the brine and a good but inexpensive variety for the dough.
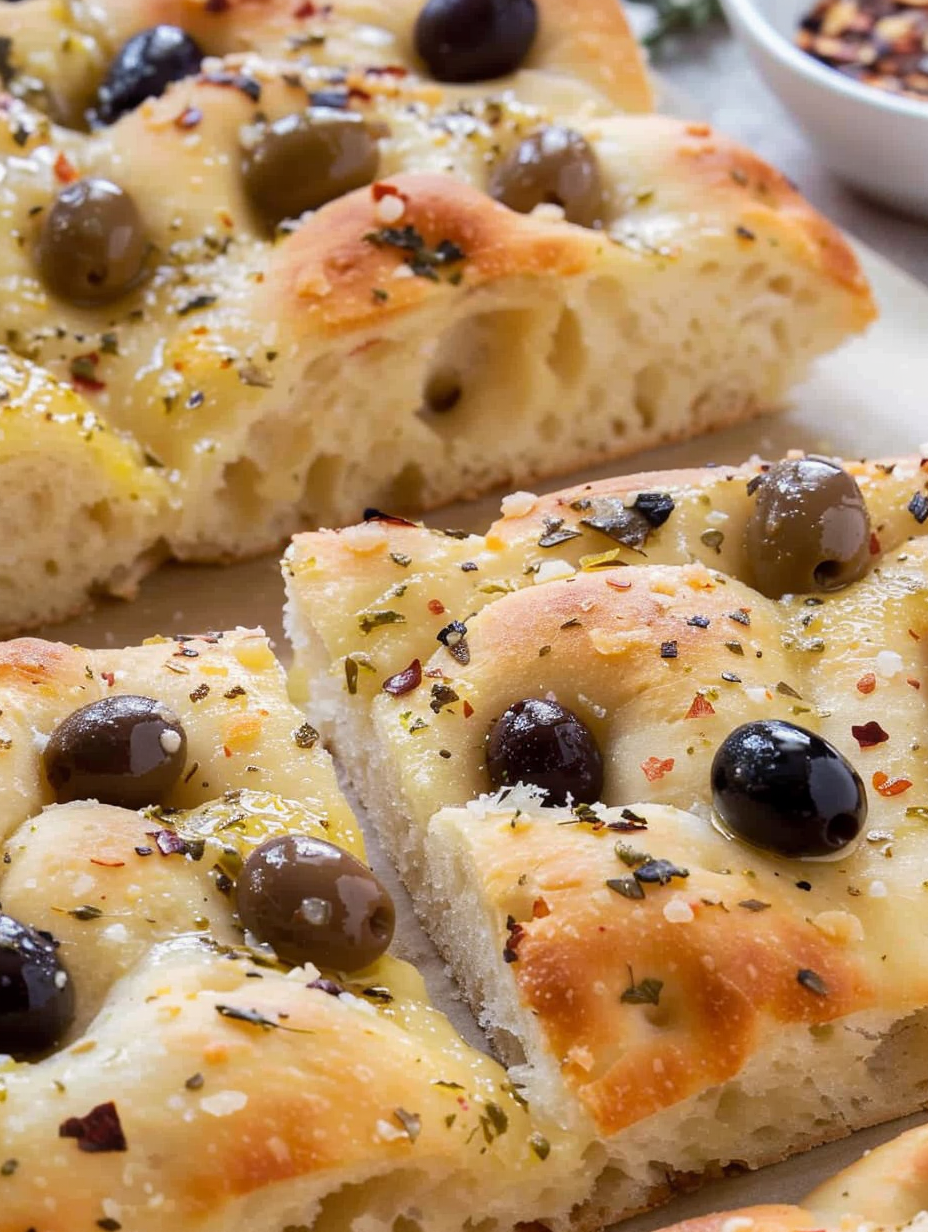
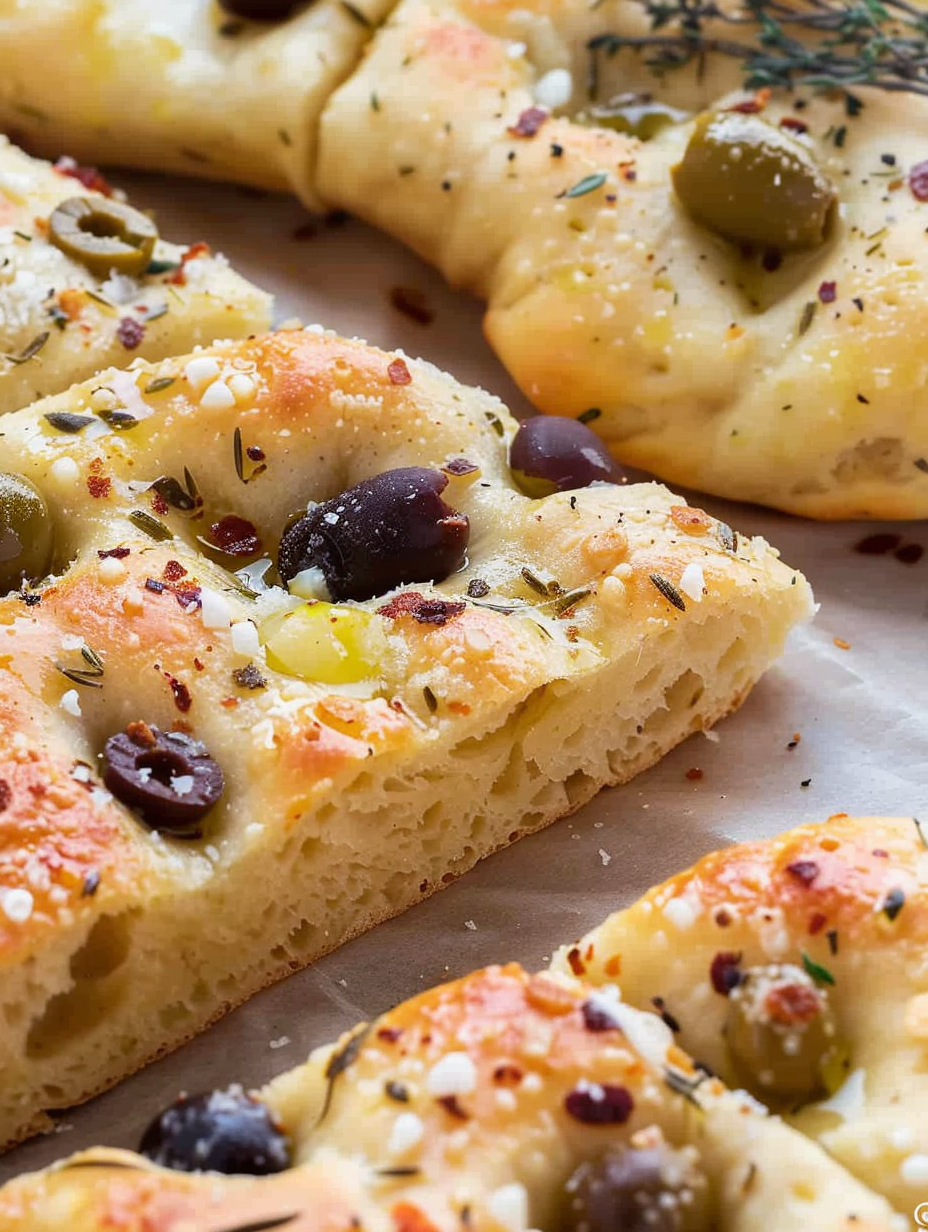
- Brine: 3 tablespoons water, 3 tablespoons olive oil, 1/2 teaspoon fine salt, and 1/4 teaspoon garlic powder. This mixture flavors the top and pools in the dimples so each bite shines.
- Kalamata olives: 1 cup (70 to 80 grams), pitted. Use high quality jarred or vacuum-packed olives for better texture and flavor.
- Oregano: 1 1/2 tablespoons dried oregano for an aromatic finish.
- Optional toppings: Sea salt flakes and chili flakes to taste for a finishing crunch and heat.
Instructions
Combine dry ingredients In a large bowl whisk together 2 1/2 cups of all-purpose flour and 3/4 teaspoon fine salt so the salt is evenly distributed. This ensures consistent seasoning and prevents pockets of concentrated salt in the dough. Activate the yeast In a separate jug combine 1 cup plus 3 tablespoons warm water with 1 teaspoon active dry yeast and 1/2 teaspoon sugar. Let sit for about five minutes until the surface becomes foamy which indicates the yeast is alive and ready to leaven the dough. Mix the dough Add the foamy yeast mixture and 2 tablespoons olive oil to the dry ingredients. Stir with a sturdy spoon or spatula until no dry flour remains. The dough will be loose and sticky which is correct. Resist adding extra flour because the hydration produces the tender interior you want. First rest Cover the bowl with a damp kitchen towel and leave in a warm place for about one hour or until doubled in size. Look for a billowy, airy surface and bubbles along the dough edge as visual cues that fermentation is progressing. Prepare the pan and shape Line a 9 by 13 inch baking pan with parchment paper or grease it with olive oil. Scrape the dough into the pan and dust lightly with flour. Starting from the center gently press the dough outward with oiled fingers until it reaches the pan corners. The dough should stretch without tearing; let it rest if it resists. Make the brine and dimple Whisk 3 tablespoons water with 3 tablespoons olive oil, 1/2 teaspoon fine salt and 1/4 teaspoon garlic powder. Pour this mixture over the dough then use your fingertips to poke dimples across the surface, aiming to fill each indentation with the brine. This is what gives the top its rich sheen and concentrated pockets of flavor. Add toppings and final proof Press pitted Kalamata olives evenly into the dough, then sprinkle 1 1/2 tablespoons oregano, salt flakes and chili flakes if using. Allow the shaped dough to rest for 30 minutes at room temperature to puff slightly before baking. Bake Preheat oven to 430 degrees Fahrenheit (220 degrees Celsius). Bake the focaccia for 15 to 20 minutes until golden and crusty on top. Cool for at least ten minutes before slicing so the crumb sets and the oils redistribute.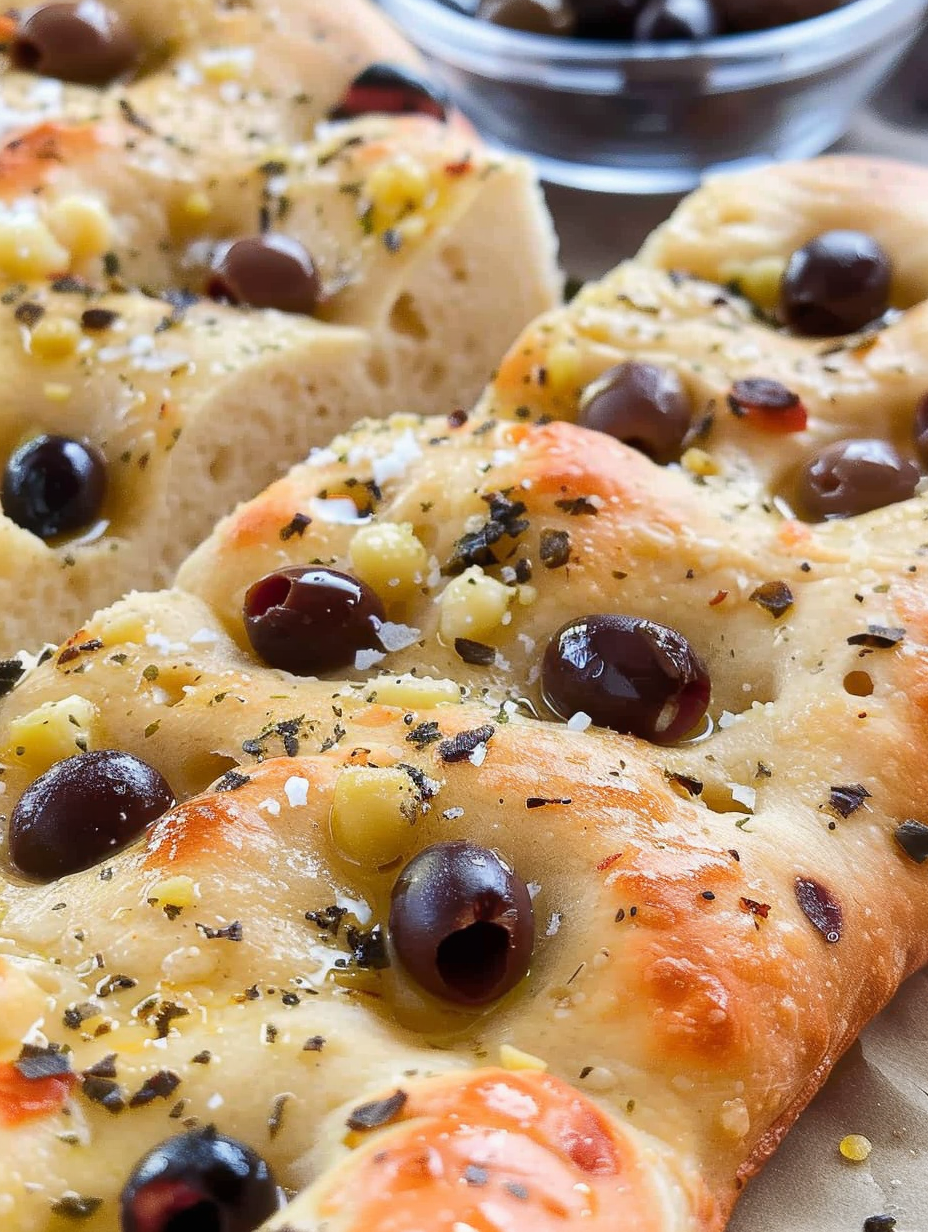
You Must Know
- Focaccia is best the day it is made but will keep in an airtight container at room temperature for up to one day. For longer storage wrap slices and freeze up to three months.
- The olive oil brine soaks into dimples creating bursts of flavor. If you like a stronger garlic note increase garlic powder or brush with a minced garlic oil after baking.
- Hydration matters. The dough will be sticky which is normal and produces an open, tender crumb after baking.
- This version is high in healthy fats from olive oil and moderate in carbohydrates from flour making it a hearty accompaniment rather than a light snack.
My favorite aspect is how reliably this method produces a bakery-style focaccia at home. I have served it to guests who assumed it was purchased from a bakery the same week I discovered the trick of pouring the brine then poking dimples. That small step makes a huge difference and is often the point everyone comments on first.
Storage Tips
Store cooled focaccia in a shallow airtight container or wrapped tightly in plastic wrap at room temperature for up to one day. To freeze, slice into serving pieces and wrap each piece in plastic then place in a freezer-safe bag for up to three months. Reheat from frozen in a 350 degrees Fahrenheit oven (175 degrees Celsius) for 10 to 12 minutes or until warmed through and the crust regains crispness. For day-of reheating, warm individual slices in a toaster oven for three to five minutes to refresh the texture.
Ingredient Substitutions
You can swap all-purpose flour for bread flour for a slightly chewier crust or use a 50 50 mix with whole wheat for more nuttiness though the crumb will be denser. If you do not have Kalamata olives use Castelvetrano or green olives for a milder flavor. For a dairy-free option avoid greasing the pan with butter and use more olive oil instead. If instant yeast is used add it directly to the flour and skip dissolving in water then reduce proofing time as indicated by the yeast brand.
Serving Suggestions
Serve warm with a bowl of tomato soup, alongside roasted vegetables, or as the base for an open-faced sandwich topped with fresh mozzarella and sliced tomatoes. For an antipasto platter cut into bite-sized squares and pair with cured meats, marinated artichokes and a drizzle of extra virgin olive oil. Sprinkle microgreens or a handful of arugula dressed lightly with lemon for a bright contrast to the rich olive oil flavor.
Cultural Background
Focaccia has roots in Italian baking traditions where flatbreads were made across regions with local variations. Ligurian focaccia is known for its olive oil richness and simple toppings such as rosemary. Adding olives became a natural extension in many coastal and southern Italian kitchens where preserved olives were a staple. The technique of dimpled surfaces and olive oil pools is a classic hallmark that encourages localized pockets of flavor.
Seasonal Adaptations
In spring and summer add halved cherry tomatoes and torn basil after baking for freshness. In autumn try roasted shallots and thyme for earthier notes. For winter gatherings top with caramelized onions and rosemary then finish with a sprinkle of flaky salt to complement heartier stews and soups.
Meal Prep Tips
Make the dough in the evening and let it rest in the refrigerator overnight for an even more developed flavor. Bring it to room temperature then shape, dimple, and proof for 30 minutes before baking. Portion baked focaccia into individual servings and store in airtight containers for easy grab-and-go sides or toasted sandwiches throughout the week.
Every time I bake this olive focaccia I am reminded how a few simple ingredients and a small amount of patience can produce an irresistible result. Share it warm with friends and watch how quickly it disappears.
Pro Tips
Use a high quality extra virgin olive oil for the brine to maximize flavor in the dimples.
Do not add extra flour to make the dough easier to handle; sticky dough yields a lighter crumb.
If the dough resists stretching when shaping, let it rest for 10 minutes to relax the gluten then continue.
Taste and adjust salt on top after baking if needed; flaky salt adds a delightful crunch.
This nourishing olive focaccia recipe is sure to be a staple in your kitchen. Enjoy every moist, high protein slice — it is perfect for breakfast or as a wholesome snack any time.
FAQs about Recipes
Can I use instant yeast instead of active dry yeast?
Yes. For instant yeast add it directly to the dry ingredients and skip dissolving in water. You can omit the sugar when using instant yeast.
How long does focaccia keep in the freezer?
Wrap cooled slices tightly and freeze up to three months. Reheat in a 350 degrees Fahrenheit oven until warmed through.
Tags
Olive Focaccia
This Olive Focaccia recipe makes perfectly juicy, tender, and flavorful steak every time! Serve with potatoes and a side salad for an unforgettable dinner in under 30 minutes.
Ingredients
Focaccia dough
Brine
Topping
Instructions
Combine dry ingredients
In a large bowl whisk together the flour and fine salt so the salt is evenly distributed which prevents areas of concentrated salt in the baked focaccia.
Activate the yeast
Stir the warm water with the active dry yeast and sugar then let rest until foamy, about five minutes. This confirms the yeast is active and ready to leaven the dough.
Mix the dough
Pour the foamy yeast mixture and olive oil into the dry ingredients and mix with a spoon until no dry flour remains. The dough will be sticky and slightly loose which creates a tender crumb.
First rest
Cover the bowl with a damp towel and let the dough rise in a warm place for about one hour or until doubled in size and bubbly at the edges.
Shape into pan
Scrape the dough onto a parchment lined or oiled 9 by 13 inch pan. Dust lightly with flour and press from the center outward with oiled fingers until it fits the pan.
Make brine and dimple
Whisk the brine ingredients then pour over the dough. Press dimples with your fingertips filling them with brine to create the characteristic textured top.
Top and final proof
Press olives into the dough and sprinkle oregano, salt flakes and chili if desired. Allow to rest for 30 minutes to puff before baking.
Bake and cool
Preheat oven to 430 degrees Fahrenheit and bake for 15 to 20 minutes until golden. Let cool at least ten minutes before slicing so the crumb sets.
Last Step: Please leave a rating and comment letting us know how you liked this recipe! This helps our business to thrive and continue providing free, high-quality recipes for you.
Nutrition
Did You Make This?
Leave a comment & rating below or tag
@flavest on social media!
Categories:
You might also like...

Glazed Apple Cider Donuts
Warm-spiced apple cider donuts with tender apple bits and a glossy cider glaze, fried crisp and irresistibly cozy for fall.

Slow Cooker Pork Pot Roast
All-day slow cooking turns pork shoulder, potatoes, and carrots into a tender, savory classic with a rich homemade gravy everyone will love.

Cheesy Hamburger Potato Casserole
Tender layers of Yukon gold potatoes with seasoned beef in a creamy, cheddar sauce, baked until bubbly and irresistibly comforting.
Did You Make This?
Leave a comment & rating below or tag @flavest on social media!
Rate This Recipe
Share This Recipe
Enjoyed this recipe? Share it with friends and family, and don't forget to leave a review!
Comments (1)
This recipe looks amazing! Can't wait to try it.
Comments are stored locally in your browser. Server comments are displayed alongside your local comments.

Hi, I'm Maria!
What's Popular

30-Minute Meals!
Join to receive our email series which contains a round-up of some of our quick and easy family favorite recipes.