
Onion Bombs (Bacon-Wrapped Beef & Cheese-Stuffed Onions)

Juicy beef and smoky bacon meet sweet onion in these cheesy, barbecue-glazed onion bombs—an irresistible crowd-pleaser for appetizers or a hearty main.
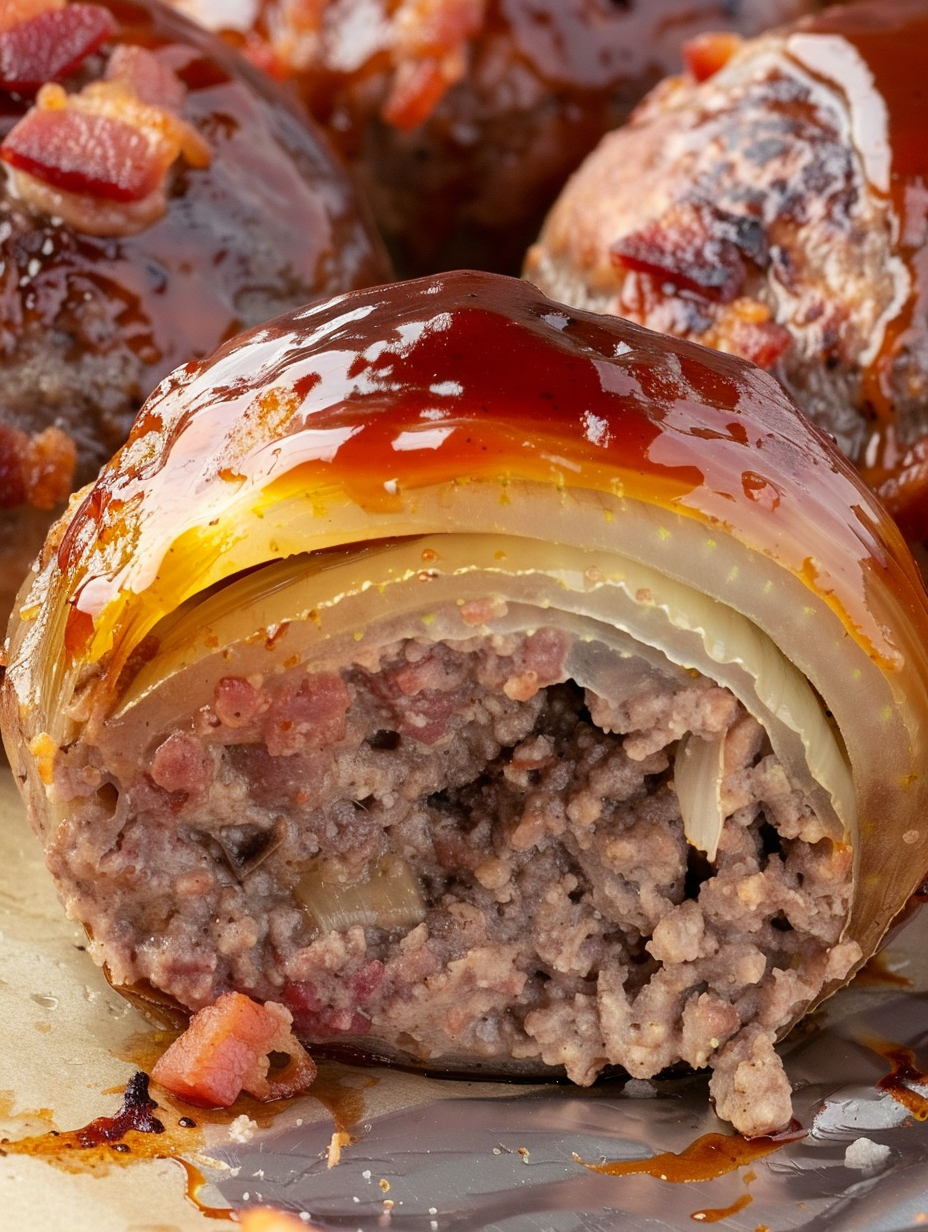
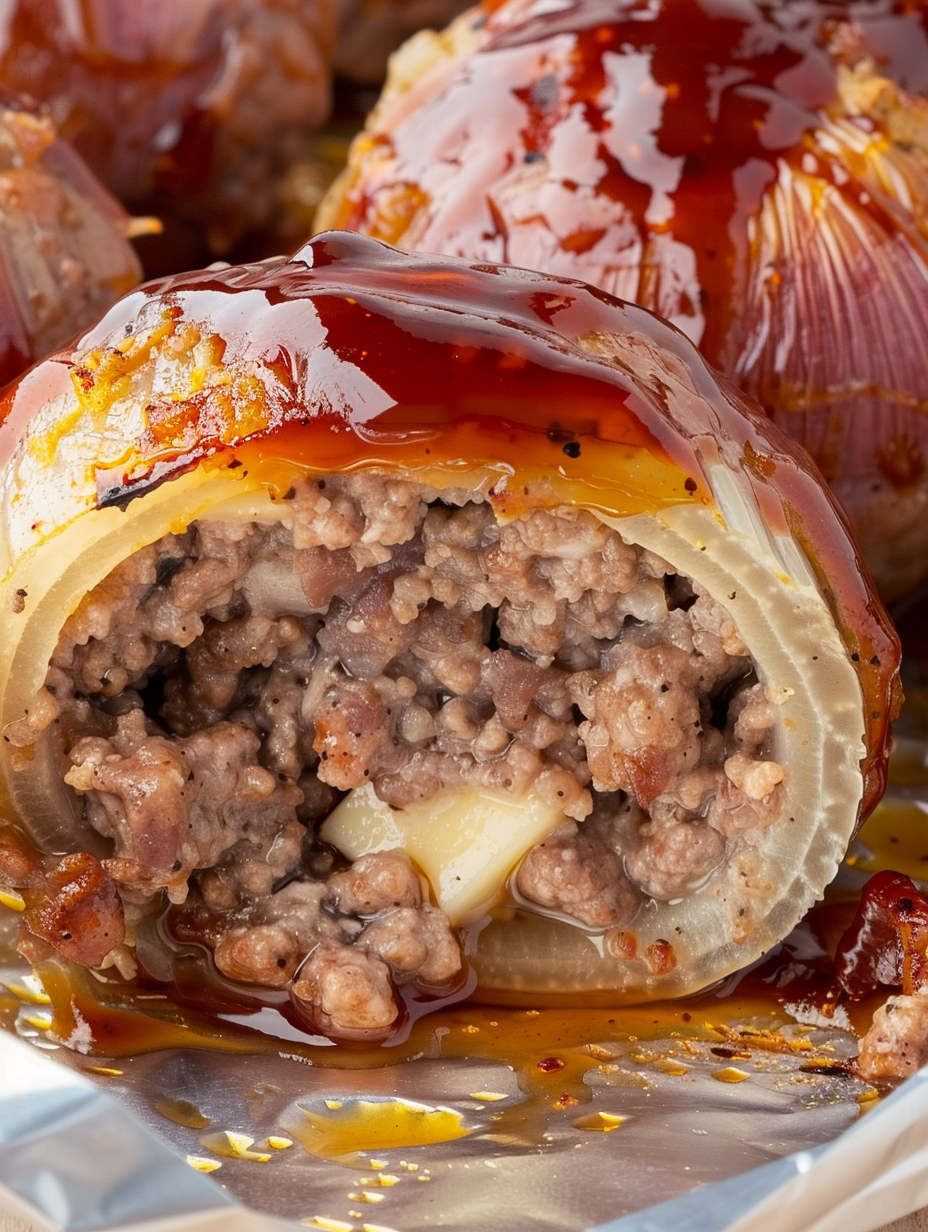
This recipe started as a playful idea the first time I wanted to combine three of my favorite things: smoky bacon, melty cheddar, and the sweet bite of roasted onions. The result — these onion bombs — are a weekend-late-afternoon revelation and now one of the most-requested dishes at every casual gathering I host. I discovered the combination during a backyard football party when I wanted handheld, satisfying bites that still felt substantial. Each bite gives you the soft-sweetness of onion, a savory, well-seasoned beef core, a molten cheddar center, and crisp bacon wrapped tight around it all.
What makes these special is the structure: onion halves act like edible shells that cradle a bacon-wrapped, cheese-stuffed beef ball. The contrast of textures — tender onion, juicy interior, and crackly bacon — plus a final brush of tangy barbecue glaze makes every bite sing. I usually assemble these ahead of time, chill them briefly so they hold their shape, then bake until the bacon is caramelized and the cheese is gooey. Family and friends always go for seconds, and I love that they’re equally comfortable as hot appetizers or a satisfyingly robust main course.
Why You'll Love This Recipe
- Handheld and shareable: perfect for parties, game days, or family dinners—each portion is pre-portioned and easy to serve.
- Built-in contrast: sweet roasted onion, well-seasoned ground beef, molten cheddar, and crisp smoky bacon all in one bite.
- Uses pantry staples: ground beef, breadcrumbs, basic seasonings, bacon, and bottled barbecue sauce (we used Sweet Baby Ray's original).
- Make-ahead friendly: can be assembled and refrigerated for a few hours before baking to hold their shape better.
- Quick to prepare: roughly 25 minutes active prep and 40 minutes in the oven—ready in just over an hour.
- Customizable: swap cheeses, try different barbecue sauces, or add chopped herbs to the meat mixture for different flavor profiles.
I remember the first time I served these: my usually picky teenager declared them "the best thing ever" and lined them up like little trophies on his plate. They’re casual enough for a weeknight and impressive enough for a crowd, which is the sweet spot in my kitchen. The smoky-sweet BBQ glaze especially gets compliments; it caramelizes into a glossy shell that pulls all the flavors together.
Ingredients
- Yellow onions (4 medium): You’ll use the outer two layers of each onion as the 'shells'—choose firm, dry onions with even rings so the halves separate cleanly. Large, evenly sized onions make assembly and cooking more predictable.
- Lean ground beef (2 pounds, 93/7): A 93% lean blend keeps the mixture juicy without excess grease. If you prefer richer flavor, a 85/15 will be juicier but render more fat.
- Bread crumbs (1/2 cup): Standard plain breadcrumbs help bind the mixture—panko will give a lighter texture, but use regular fine breadcrumbs if you want a denser bite.
- Egg (1 large) and whole milk (1/4 cup): These act as a binder and keep the interior tender; room-temperature egg mixes more evenly with the meat.
- Barbecue sauce: 3 tablespoons go into the meat for flavor; an additional 1/3 cup is reserved for brushing during baking. We used Sweet Baby Ray’s original for its balance of sweetness and tang.
- Seasonings: 1 teaspoon garlic powder, 1 teaspoon onion powder, 1 teaspoon salt, and 1/4 teaspoon black pepper—simple but effective for savory depth.
- Cheddar cheese cubes (8, 1-inch): Sharp cheddar gives good melt and flavor; cut uniform 1-inch cubes so every center melts consistently.
- Center-cut smoked bacon (16 pieces): Two strips per bomb, laid in an X and wrapped snugly to hold everything together while adding essential smoky crispness.
Instructions
Preheat and prepare the pan: Preheat the oven to 425°F. Line a large rimmed baking sheet with aluminum foil to catch drips. Use a wire rack on the sheet if you want extra airflow around the bacon for a crispier result, but it’s fine directly on foil as well. Set the pan aside so it’s ready when assembly is complete. Prepare the onion shells: Slice the top and bottom off each onion and peel away the papery outer skin. Cut each onion in half through the root to get even halves. Carefully remove the two outer layers from each half—these should be large curved pieces that will form the shell. If layers stick, soak the whole onion in hot (not boiling) water for 3–4 minutes to loosen them, then separate gently. Pat the pieces dry and set them aside. Mix the filling: In a large mixing bowl combine 2 pounds of lean ground beef, 1/2 cup breadcrumbs, 1 large egg, 1/4 cup whole milk, 3 tablespoons barbecue sauce, 1 teaspoon garlic powder, 1 teaspoon onion powder, 1 teaspoon salt, and 1/4 teaspoon black pepper. Mix with your hands or a wooden spoon until just combined—avoid overworking which can make the filling dense. Chill for 10 minutes if the mixture feels too soft to shape. Portion and form: Divide the meat mixture into 8 equal portions. Flatten each portion into a 3–4 inch disc in your hand, place a 1-inch cheddar cube in the center, then fold the meat around the cheese, sealing it tightly to form a large, smooth meatball with the cheese fully encased. A tight seal prevents cheese leakage during baking. Assemble with onion and bacon: Place one meatball between two matching onion half-shells so the onion encases most of the meatball surface. Lay two bacon slices in an X pattern on a work surface, set the onion-encased meatball in the center, and pull the bacon up and around, overlapping slightly. Secure with a toothpick if necessary and place seam-side down on the prepared sheet. Repeat until all eight are assembled. Bake, glaze, and finish: Bake in the preheated oven for 30 minutes. Remove the sheet and brush each onion bomb with the remaining 1/3 cup barbecue sauce, coating the top and sides. Return to the oven and bake an additional 10–15 minutes, or until bacon is golden and crisp and the interior reaches 160–165°F on an instant-read thermometer. Let rest 5 minutes before serving so juices redistribute and the cheese settles.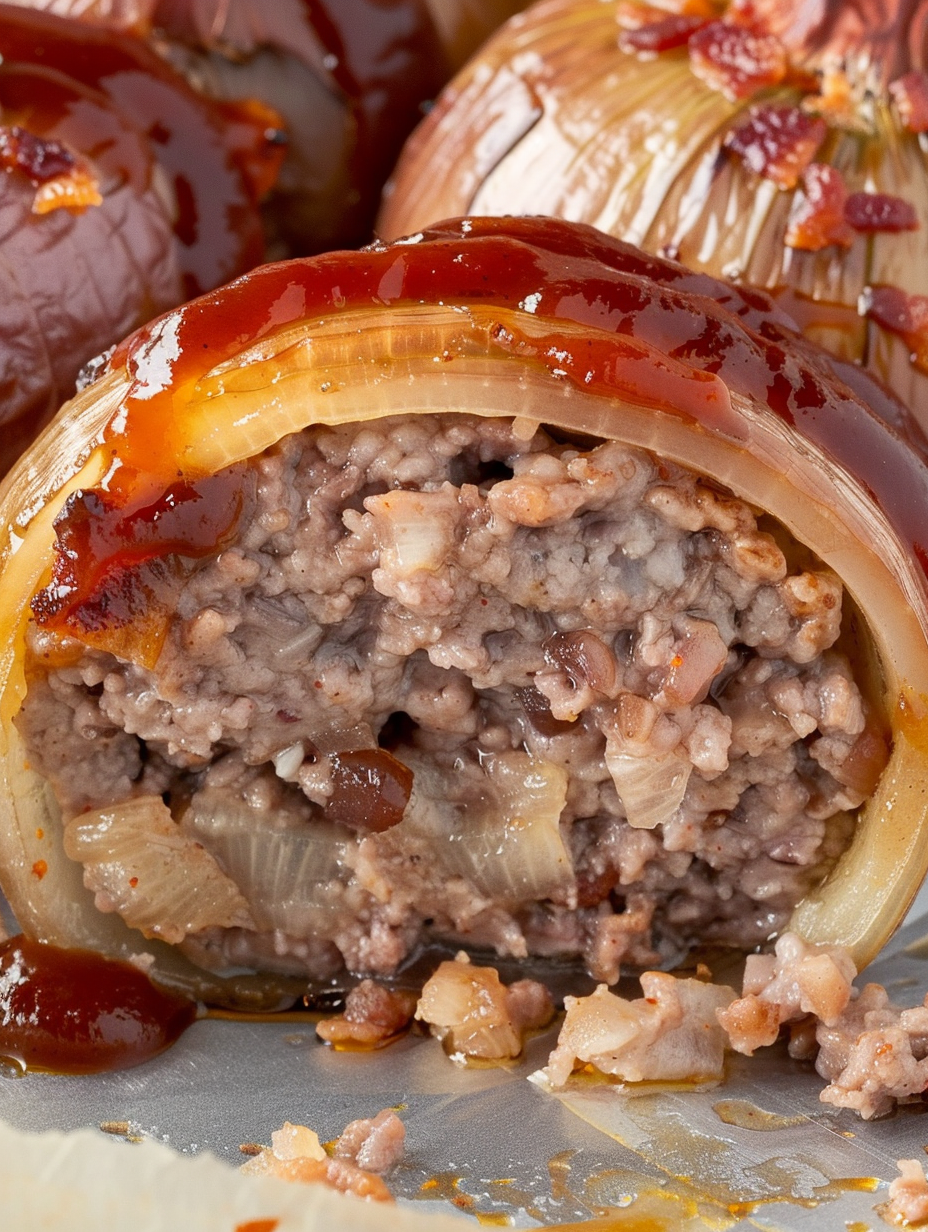
You Must Know
- Storage: Refrigerate leftover onion bombs in an airtight container for up to 3 days; freeze for up to 3 months. Reheat gently in a 350°F oven to preserve bacon texture.
- Doneness: Use an instant-read thermometer; target 160–165°F internal temperature for safely cooked beef without drying out the filling.
- Assembly tip: Chilling the formed bombs for 10–15 minutes before baking helps them keep their shape during the initial high heat stage.
- Barbecue timing: Brush sauce toward the end to avoid burning; glazing at the 30-minute mark gives a glossy, caramelized finish without charring.
My favorite part is watching the bark form on the bacon after the barbecue glaze goes on—the color, aroma, and sticky sheen are addictive. At a family gathering, someone always insists on sampling one fresh from the oven, and the chorus of "wow" is my favorite cooking review. The onion provides a vegetable element without stealing the spotlight, and the cheddar gives a delightful molten center that kids and adults both adore.
Storage Tips
Store cooled onion bombs in a shallow airtight container: in the refrigerator they keep well for up to 3 days. For longer storage, freeze uncooked (assembled) bombs on a tray until firm, then transfer to a freezer bag for up to 3 months—bake from frozen but add 10–15 minutes to the cooking time and watch internal temperature. To reheat cooked bombs, use a 350°F oven until heated through; avoid microwaves for reheating if you care about bacon crispness, as microwaving makes bacon limp.
Ingredient Substitutions
If you need gluten-free, swap regular breadcrumbs for gluten-free breadcrumbs or crushed gluten-free crackers. For dairy-free versions use vegan cheese alternatives and substitute milk with unsweetened non-dairy milk, although texture will change slightly. To reduce pork, replace bacon with turkey bacon (note: flavor and crispness differ). For a spicier profile add 1/2 teaspoon cayenne to the meat mix or use a chipotle barbecue sauce.
Serving Suggestions
Serve hot with extra barbecue sauce on the side and a simple green salad to balance the richness. For a party, arrange bombs on a platter over a bed of fresh arugula and sprinkle with chopped parsley. Pair with coleslaw, roasted potatoes, or grilled corn for a hearty meal. Garnish with flaky sea salt after glazing for a professional finish and sprinkle chopped green onion for color contrast.
Cultural Background
Onion bombs are a modern American comfort-food mashup inspired by stuffed vegetables and bacon-wrapped appetizers that are staples at backyard cookouts. They borrow elements from meat-stuffed peppers and bacon-wrapped meatballs common in American party spreads. The use of bottled barbecue sauce reflects regional BBQ tastes—classically sweeter in the Midwest and tangier in the Carolinas—so you can dial the sauce to reflect regional preference.
Seasonal Adaptations
In cooler months, swap sharp cheddar for smoked gouda and add a teaspoon of Worcestershire to the meat for deeper, savory notes. For summer, use lighter barbecue sauces and serve with a chilled corn salad. For holiday gatherings, try adding minced sage or rosemary to the meat mixture for a festive twist. Seasonal toppings like caramelized shallots or a mustard glaze change the character and pair beautifully with roasted vegetables typical of the season.
Meal Prep Tips
Assemble the bombs and refrigerate them on the baking sheet covered with plastic wrap for up to 24 hours before baking—this firms the meat and improves hold. If freezing, flash-freeze assembled bombs on a tray then bag and label. Thaw overnight in the refrigerator before finishing in the oven. For portion control, these are ideal for lunches or packable dinners—reheat gently and serve with a crisp side salad for a balanced meal.
These onion bombs are the kind of recipe that earns its place in a well-worn binder: dependable, flexible, and beloved by guests. Make them your own, and don’t be surprised if they become a signature at your next gathering.
Pro Tips
Chill assembled bombs for 10–15 minutes before baking to help them hold their shape.
Seal the cheese completely inside the meat to prevent leaking during cooking.
Brush barbecue sauce on during the last 10–15 minutes to avoid burning and achieve a glossy caramelized finish.
Use a wire rack on the baking sheet for crisper bacon if desired.
This nourishing onion bombs (bacon-wrapped beef & cheese-stuffed onions) recipe is sure to be a staple in your kitchen. Enjoy every moist, high protein slice — it is perfect for breakfast or as a wholesome snack any time.
FAQs about Recipes
How do I know when the onion bombs are fully cooked?
Use an instant-read thermometer to ensure the interior reaches 160–165°F. If the bacon looks done but the interior is not, lower the oven to 375°F and continue cooking until temperature is reached to avoid over-browning.
Can I make these ahead of time?
Assemble and refrigerate for up to 24 hours on a tray covered in plastic wrap. For longer storage, flash-freeze then transfer to freezer bags for up to 3 months.
Tags
Onion Bombs (Bacon-Wrapped Beef & Cheese-Stuffed Onions)
This Onion Bombs (Bacon-Wrapped Beef & Cheese-Stuffed Onions) recipe makes perfectly juicy, tender, and flavorful steak every time! Serve with potatoes and a side salad for an unforgettable dinner in under 30 minutes.
Ingredients
Onion shells
Meat mixture
Fillings & wrap
Sauce
Instructions
Preheat and pan prep
Preheat oven to 425°F and line a large rimmed baking sheet with aluminum foil. Optionally place a wire rack on the sheet for crisper bacon. Set aside.
Prepare the onion shells
Trim tops and bottoms, peel papery skin, cut each onion in half through the root, and remove the two outer layers from each half. Pat dry. If layers stick, soak whole onions in hot water for 3–4 minutes to loosen.
Mix the filling
Combine ground beef, breadcrumbs, egg, milk, 3 tablespoons barbecue sauce, garlic powder, onion powder, salt, and pepper in a large bowl. Mix until evenly combined without overworking.
Portion and form
Divide the mixture into 8 portions. Flatten each into a 3–4 inch disc, add a 1-inch cheddar cube to the center, and seal to form a tight meatball with cheese fully encased.
Assemble with onion and bacon
Place meatball between two matching onion halves, then lay two bacon strips in an X, set the onion bomb in the center, and wrap bacon around. Secure with a toothpick if needed and place seam-side down on the prepared sheet.
Bake and glaze
Bake for 30 minutes, remove, and brush each bomb with remaining 1/3 cup barbecue sauce. Return to oven and bake 10–15 more minutes until bacon is golden and the internal temperature reaches 160–165°F. Rest 5 minutes before serving.
Last Step: Please leave a rating and comment letting us know how you liked this recipe! This helps our business to thrive and continue providing free, high-quality recipes for you.
Nutrition
Did You Make This?
Leave a comment & rating below or tag
@flavest on social media!
Categories:
You might also like...

Glazed Apple Cider Donuts
Warm-spiced apple cider donuts with tender apple bits and a glossy cider glaze, fried crisp and irresistibly cozy for fall.

Slow Cooker Pork Pot Roast
All-day slow cooking turns pork shoulder, potatoes, and carrots into a tender, savory classic with a rich homemade gravy everyone will love.

Cheesy Hamburger Potato Casserole
Tender layers of Yukon gold potatoes with seasoned beef in a creamy, cheddar sauce, baked until bubbly and irresistibly comforting.
Did You Make This?
Leave a comment & rating below or tag @flavest on social media!
Rate This Recipe
Share This Recipe
Enjoyed this recipe? Share it with friends and family, and don't forget to leave a review!
Comments (1)
This recipe looks amazing! Can't wait to try it.
Comments are stored locally in your browser. Server comments are displayed alongside your local comments.

Hi, I'm Maria!
What's Popular

30-Minute Meals!
Join to receive our email series which contains a round-up of some of our quick and easy family favorite recipes.