
Santa Hat Brownies

Fudgy chocolate brownies topped with vanilla frosting and fresh strawberries for a festive Santa hat finish — perfect for holiday gatherings and easy to make.
This Santa Hat Brownies idea was born one December evening when I wanted a dessert that felt festive but stayed simple enough for weeknight baking. These brownies are deeply chocolatey with a dense, fudgy crumb that holds up to a playful topping. I discovered the combination during a holiday baking swap; a friend brought brownies topped with whipped cream and berries, and I immediately imagined a sturdier version that would hold the iconic Santa hat shape. The result is a treat that looks special but requires minimal piping skills. The brownie base is rich and cocoa-forward, while the vanilla frosting and fresh strawberries add a bright, festive contrast.
What makes these special is the texture contrast and the nostalgic presentation. The interior is moist and glossy from the oil and melted chocolate, while the top gets a thin crackle that gives the first bite a satisfying snap. When I first served these at a family cookie exchange, kids raced to grab the biggest strawberries and adults kept asking for the recipe. They are ideal for holidays when you want something whimsical without spending hours decorating. Because the topping is fresh fruit and a dab of store-bought frosting, assembly is fast and forgiving.
Why You'll Love This Recipe
- Easy to make and impressive to serve: the base is a one-bowl batter that takes minutes to mix and less than an hour to bake, so you can go from pantry to table quickly.
- Uses common pantry staples: all-purpose flour, brown sugar, oil, and chocolate chips make this accessible year-round without specialty shopping.
- Make-ahead friendly: bake the base a day ahead, store cooled in an airtight container, and finish with strawberries the day you serve for the freshest look.
- Crowd-pleasing appearance: each square becomes a little Santa hat, which is both kid-friendly and festive for adults at holiday parties.
- Flexible serving sizes: slice into 9 generous squares or 16 smaller bites depending on the crowd and dessert table layout.
Personally, I love how everyone gravitates to the platter the minute the strawberries go on. At our last holiday brunch the platter was empty in minutes and people asked whether the brownie base used butter or oil. They were surprised it used oil — it keeps the crumb ultra-fudgy and easier to slice cleanly. I also discovered that slightly underbaking by a few minutes creates a gooier center that pairs wonderfully with the fresh berry topping.
Ingredients
- All-Purpose Flour: 3/4 cup. Use a spoon-and-level method for accuracy; this amount provides structure without drying the brownies. King Arthur or Gold Medal all-purpose is reliable.
- Salt: 1/2 teaspoon. Balances the sweetness and heightens chocolate flavor; use fine table salt so it dissolves evenly.
- Baking Soda: 1/4 teaspoon. A small lift to keep the brownies from becoming cakey; it helps create a thin crackly top when combined with the sugar.
- Eggs: 2 large. Bring to room temperature before mixing for better emulsification and glossy batter.
- Light Brown Sugar: 3/4 cup. Adds moisture and a subtle toffee note; pack lightly into the cup for consistent sweetness.
- Vegetable Oil: 3/4 cup. Oil yields a denser, fudgier texture than butter. Neutral oils like canola or sunflower work well.
- Water: 2 tablespoons. Helps loosen the batter slightly so it pours smoothly into the pan.
- Vanilla Extract: 1 teaspoon. A small splash rounds out flavors; use pure vanilla for the best aroma.
- Semi-Sweet Chocolate Chips: 1 1/2 cups, divided. Melt 1 cup into the batter for deep chocolate intensity and fold in 1/2 cup for pockets of melted chocolate while baking. I prefer Ghirardelli or Nestle for consistent melting.
- Vanilla Frosting: 1/2 cup. Store-bought buttercream is fine — you need only small amounts. If you prefer homemade, a simple powdered sugar and butter blend thinned with a teaspoon of milk works well.
- Fresh Strawberries: 9 medium. Choose firm, ripe strawberries with a bright red color. Slice the stem end flush so they sit nicely on the frosting circle.
Instructions
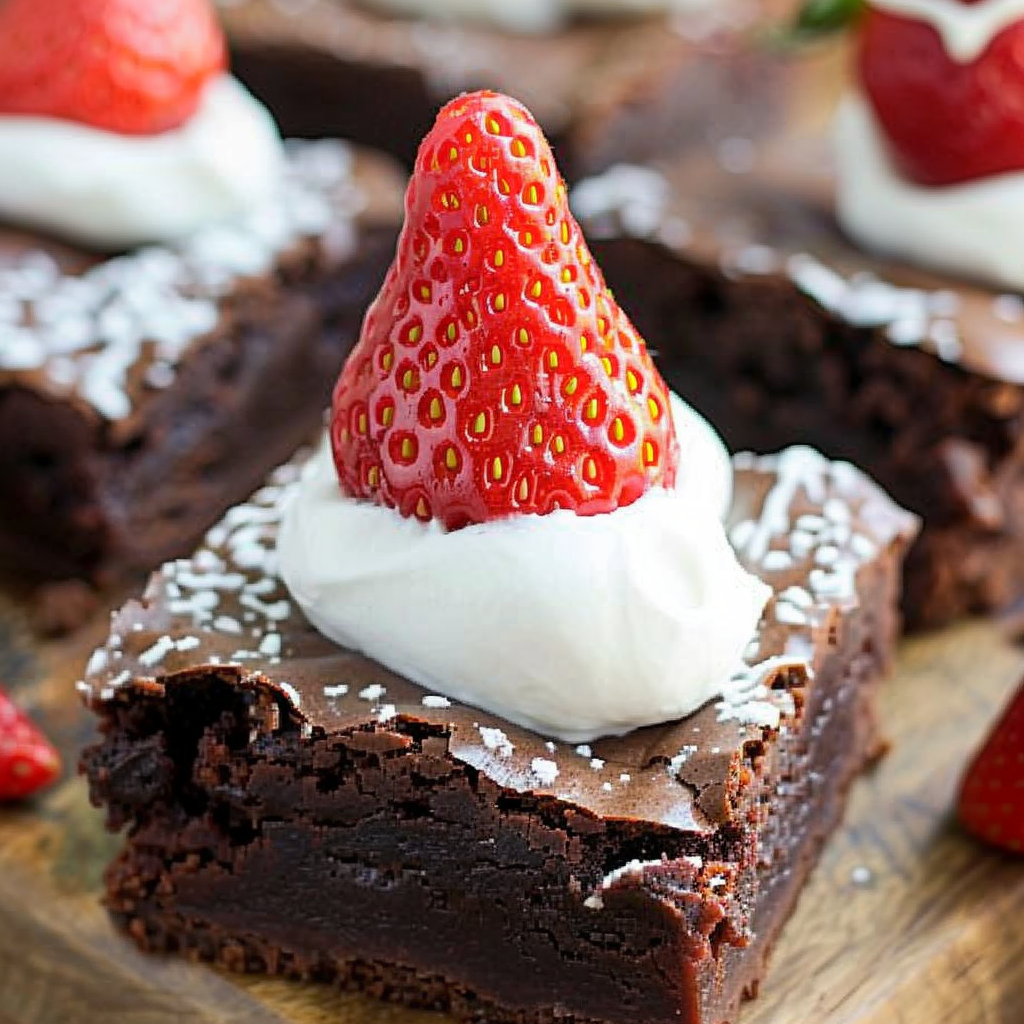
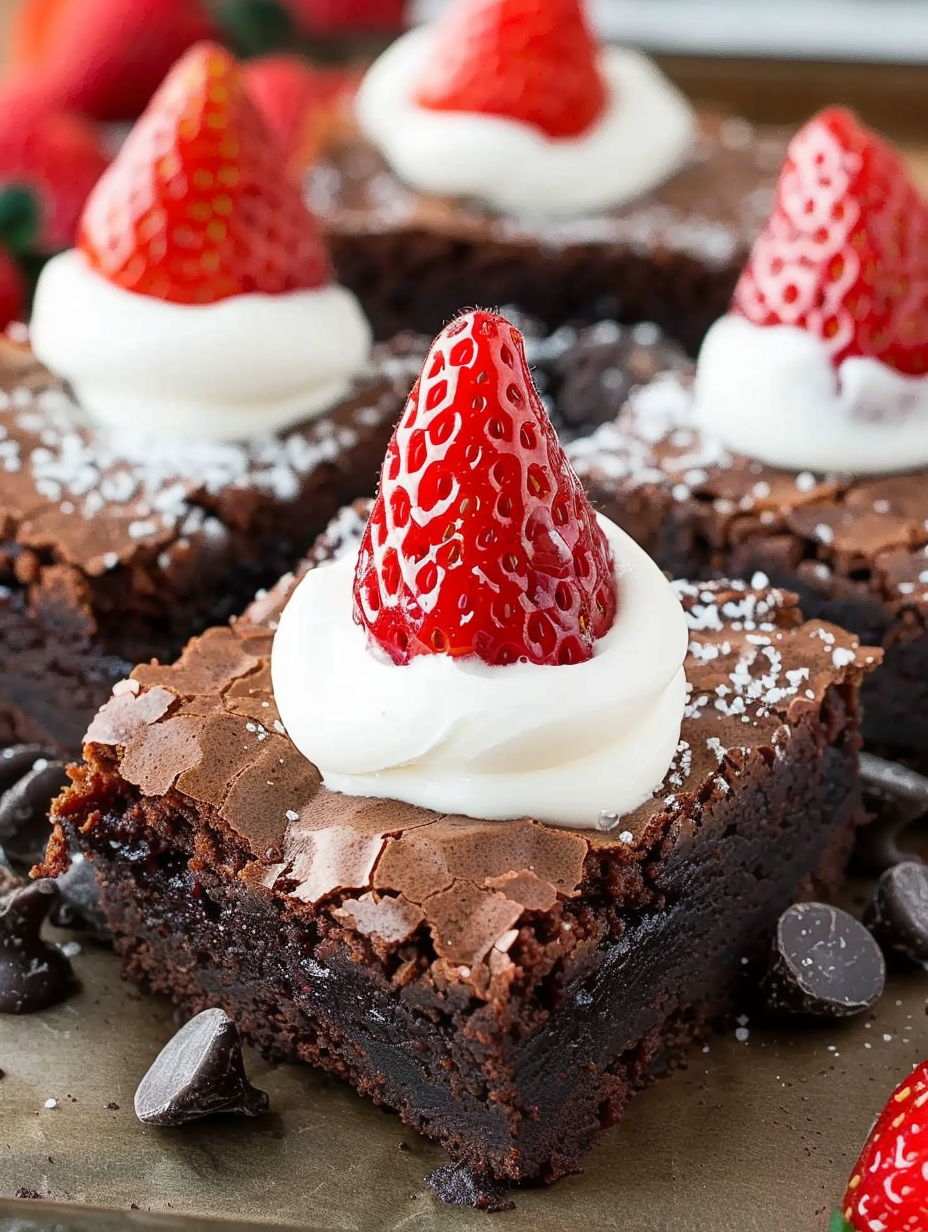
Preheat and Prepare Pan: Preheat oven to 350 degrees F. Line an 8x8-inch baking pan with parchment paper leaving an overhang for easy removal. This prevents sticking and helps you lift the whole slab out to cool before slicing. Whisk Dry Ingredients: In a small bowl, combine 3/4 cup all-purpose flour, 1/2 teaspoon salt, and 1/4 teaspoon baking soda. Whisk to aerate and remove lumps; set aside. Properly mixed dry ingredients ensure even crumb without overwork. Mix Wet Ingredients: In a large bowl, whisk 2 large eggs, 3/4 cup light brown sugar, and 3/4 cup vegetable oil vigorously for 2 minutes until glossy and slightly thickened. This step creates emulsion and incorporates air for a lighter top crust. Add Liquids and Dry: Whisk in 2 tablespoons water and 1 teaspoon vanilla extract until fully combined. Fold in the reserved dry ingredients gently until no streaks remain; do not overmix or the brownies may become cakey. Melt Chocolate: Place 1 cup of the chocolate chips in a microwave-safe bowl and microwave in 30-second intervals, stirring between, until smooth, about 60 seconds total. Allow to cool slightly before whisking into the batter so the eggs do not scramble. Combine and Add Chips: Whisk the melted chocolate into the batter until fully combined and homogenous. Stir in the remaining 1/2 cup chocolate chips by hand to distribute pockets of chocolate throughout the batter. Bake: Pour the batter into the prepared pan and smooth the top. Bake at 350 degrees F for 50 to 55 minutes. Start checking at 45 minutes; a toothpick inserted into the center should have moist crumbs but not raw batter. For a fudgier center, err on the shorter time. Cool and Assemble: Remove from oven and transfer to a wire rack. When cooled, lift the slab using the parchment overhang and cut into 9 squares. On each square, pipe a circle of vanilla frosting, place a strawberry with the cut side down to form the hat, and add a small dollop of frosting to the tip of the berry to mimic the pom pom.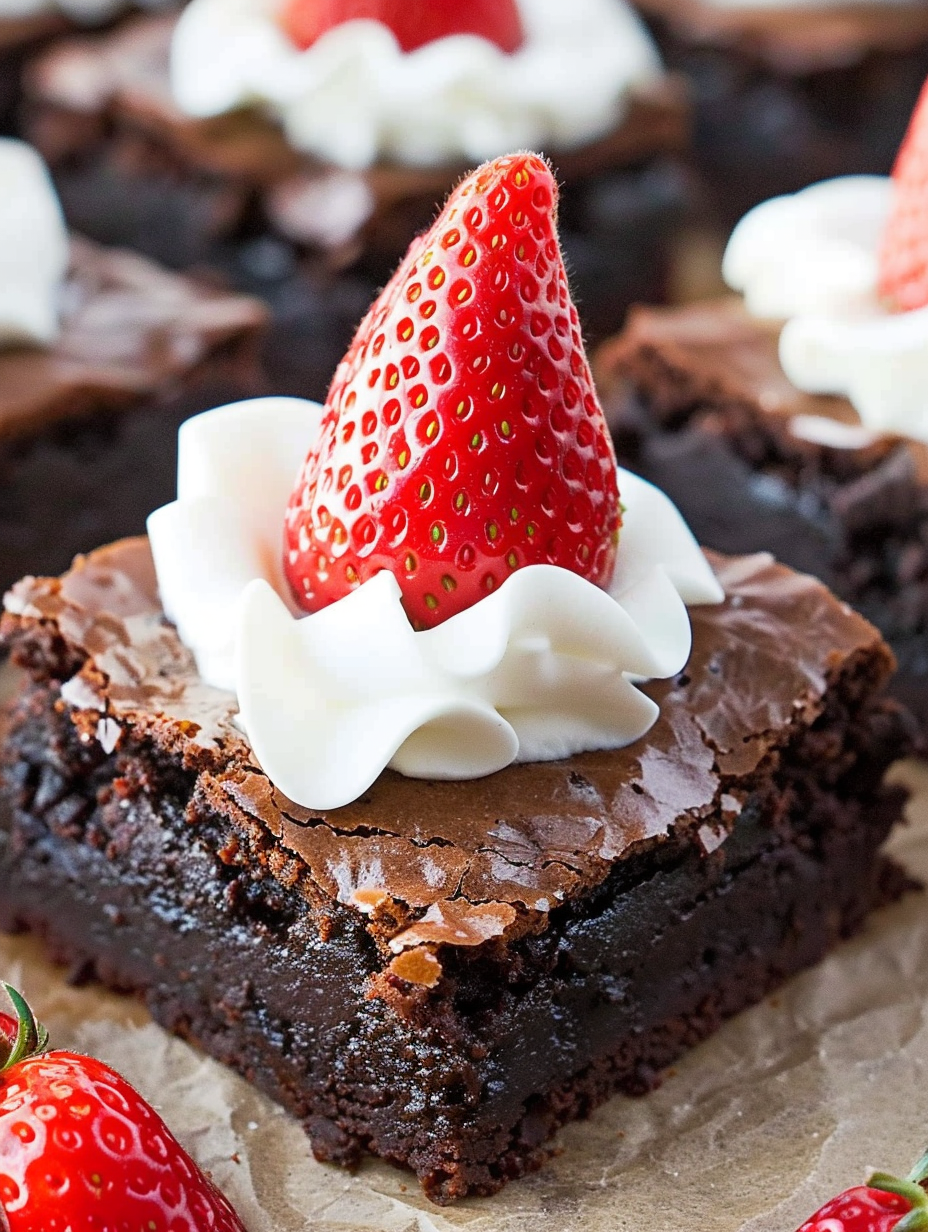
You Must Know
- Storage: Store cooled squares in an airtight container at room temperature for up to 2 days or refrigerate for up to 5 days. The strawberries are best added the day you serve to avoid sogginess.
- Freezing: The unfrosted slab freezes well for up to 3 months wrapped tightly in plastic and foil. Thaw overnight in the refrigerator and bring to room temperature before cutting and topping.
- Nutrition note: These are rich treats; enjoy small portions. Each large square is higher in calories due to oil and chocolate.
- Allergies: Contains eggs and wheat and may contain dairy or soy depending on chocolate and frosting brands.
My favorite aspect is how quickly the platter disappears when placed on a holiday table. Guests adore the playful look and often ask for tips on slicing and piping. The easiest trick is to use parchment to lift the slab and a serrated knife wiped between cuts for clean edges. I once served these at a charity bake sale and they were the first item to sell out — people kept coming back for second servings.
Storage Tips
To maintain the best texture, cool the brownies completely before storing. For room temperature storage, use a shallow airtight container and layer parchment between layers to prevent sticking. If you refrigerate, allow the brownies to sit at room temperature for 20 minutes before serving to regain tenderness. For longer storage, freeze the unfrosted slab tightly wrapped in plastic and then foil. When ready to serve, thaw in the refrigerator overnight, bring to room temperature, then add frosting and strawberries for a fresh finish. Avoid freezing with fresh fruit on top as it degrades quality.
Ingredient Substitutions
If you prefer butter to oil, substitute 1/2 cup melted unsalted butter plus 1/4 cup neutral oil for a balanced flavor and slightly firmer texture. For a gluten-free option, replace the flour with a 1:1 gluten-free baking blend and add 1/4 teaspoon xanthan gum if your blend lacks it. Swap light brown sugar for dark brown sugar for a more pronounced molasses note. Use dairy-free chocolate chips and non-dairy frosting to make the toppings lactose-free. Note that changing fats can alter baking time and texture slightly.
Serving Suggestions
Serve these on a festive platter with powdered sugar dusted around the edges for a snow-like effect. They pair beautifully with lightly sweetened whipped cream or a scoop of vanilla ice cream for contrast. For a grown-up twist, drizzle a teaspoon of warmed salted caramel over each brownie before adding the strawberry. These are perfect for dessert tables, cookie exchanges, or as a last-minute hostess gift — package a few in a small box with parchment.
Cultural Background
While the classic brownie traces its roots to American baking in the late 19th century, decorative variations became popular as home bakers sought themed treats for holidays. The Santa hat motif borrows from traditional Christmas iconography and translates well to individual brownie squares. This playful approach is part of a broader tendency in American holiday baking to adapt simple bases like blondies and brownies into seasonal shapes using fruit and minimal frosting. It keeps the spirit of home-baked comfort while adding a festive visual cue.
Seasonal Adaptations
In winter, swap strawberries for candied cherries or tiny marshmallows for a snowman-themed take. During summer, use raspberries and lemon frosting for a lighter, tangy finish. For Valentine’s Day, top with chocolate-dipped strawberries and a sprinkle of sea salt. Adjust the base by stirring in 1/4 cup chopped toasted walnuts or pecans for autumn gatherings. These small changes allow the same formula to work year-round while keeping preparation familiar.
Meal Prep Tips
To prep for a party, bake the slab the day before and cool completely. Store unfrosted squares in a single layer wrapped tightly with plastic wrap and keep strawberries whole and unwashed in the refrigerator in a breathable container. On the day, cut and frost only the pieces you will serve within a few hours to keep strawberries fresh and prevent moisture from softening the top. Use a piping bag with a small round tip for uniform frosting circles quickly.
These Santa Hat Brownies combine quick assembly, crowd-pleasing flavor, and a festive look that makes holiday baking less stressful and more joyful. Give them a try and make them your own with simple swaps — they always bring smiles at the table.
Pro Tips
Whisk eggs and sugar vigorously for two minutes to incorporate air and help form a thin crackly top.
Melt the chocolate gradually in 30-second microwave intervals and stir between to avoid burning.
Let the slab cool completely before cutting to get clean edges; use a serrated knife wiped between cuts.
This nourishing santa hat brownies recipe is sure to be a staple in your kitchen. Enjoy every moist, high protein slice — it is perfect for breakfast or as a wholesome snack any time.
FAQs about Recipes
How do I know when the brownies are done?
Bake times vary by oven. Start checking at 45 minutes and look for moist crumbs on a toothpick rather than wet batter.
Can I freeze these?
Yes. Freeze the unfrosted slab wrapped in plastic and foil for up to 3 months. Thaw in the refrigerator overnight before finishing.
Tags
Santa Hat Brownies
This Santa Hat Brownies recipe makes perfectly juicy, tender, and flavorful steak every time! Serve with potatoes and a side salad for an unforgettable dinner in under 30 minutes.
Ingredients
Brownie Base
Topping
Instructions
Preheat and prepare pan
Preheat oven to 350 degrees F. Line an 8x8-inch pan with parchment leaving an overhang for easy removal.
Combine dry ingredients
Whisk together 3/4 cup flour, 1/2 teaspoon salt, and 1/4 teaspoon baking soda in a small bowl and set aside.
Mix wet ingredients
In a large bowl whisk 2 eggs, 3/4 cup brown sugar, and 3/4 cup vegetable oil for two minutes until glossy.
Add liquids and dry
Whisk in 2 tablespoons water and 1 teaspoon vanilla, then fold in the dry ingredients until just combined.
Melt chocolate
Melt 1 cup chocolate chips in a microwave-safe bowl in 30-second intervals, stirring until smooth, then whisk into batter.
Fold in chips and bake
Stir in remaining 1/2 cup chips, pour batter into pan, and bake 50 to 55 minutes until a toothpick shows moist crumbs.
Cool and assemble hats
Cool completely on a rack, cut into 9 squares, pipe a frosting circle on each, add a strawberry, and top with a frosting dot.
Last Step: Please leave a rating and comment letting us know how you liked this recipe! This helps our business to thrive and continue providing free, high-quality recipes for you.
Nutrition
Did You Make This?
Leave a comment & rating below or tag
@flavest on social media!
Categories:
You might also like...

Glazed Apple Cider Donuts
Warm-spiced apple cider donuts with tender apple bits and a glossy cider glaze, fried crisp and irresistibly cozy for fall.

Slow Cooker Pork Pot Roast
All-day slow cooking turns pork shoulder, potatoes, and carrots into a tender, savory classic with a rich homemade gravy everyone will love.

Cheesy Hamburger Potato Casserole
Tender layers of Yukon gold potatoes with seasoned beef in a creamy, cheddar sauce, baked until bubbly and irresistibly comforting.
Did You Make This?
Leave a comment & rating below or tag @flavest on social media!
Rate This Recipe
Share This Recipe
Enjoyed this recipe? Share it with friends and family, and don't forget to leave a review!
Comments (1)
This recipe looks amazing! Can't wait to try it.
Comments are stored locally in your browser. Server comments are displayed alongside your local comments.

Hi, I'm Maria!
What's Popular

30-Minute Meals!
Join to receive our email series which contains a round-up of some of our quick and easy family favorite recipes.